NetSuite, Data Migration, QuickBooks
Updated
Updated
10 min Read
To load financials and open transactions from QuickBooks to NetSuite, you post historical balances as a summary journal entry, then load open transactions separately against a fictitious customer/vendor so your subledgers reconcile. Here is the full process with a worked example.
Companies migrating from QuickBooks to NetSuite must load historical financial statements and open transactions to start using their new accounting system. This step is known as the financial data migration process. It lets you use NetSuite's reporting functionality and begin processing transactions immediately after your go-live date.
TL;DR
- Load historical financials from QuickBooks as a single summary journal entry, using your legacy trial balance mapped to NetSuite accounts and departments.
- Assign a fictitious customer/vendor to any AR/AP lines so you do not create permanent "No Vendor" or "No Customer" rows on your subledger reports.
- Load open transactions (vendor bills, invoices, purchase orders) separately, reversing the fictitious entity so its balance nets to zero.
- Validate with a trial balance tie-out and a subledger tie-out at go-live, and confirm what your auditors need first.
This article covers historical financial statements and open transactions, provides a simple example, and points to resources to complete the process. It is relevant for companies planning to load summary-level data. If you plan to load detailed historical transactions, this article will not apply.
What are historical financial statements?
Historical financial statements are the summarized results of thousands of individual transactions in your legacy accounting system. When moving to a new system, like NetSuite, it is common to bring over a summary journal entry to record this data. Several benefits of completing this task are:
-
Preparing comparative financial statements for use in a Securities and Exchange Commission (SEC) filing
-
Reducing the need to open your legacy accounting system for prior period financials and converting to your new NetSuite segment structure
-
Reviewing year-over-year comparison reports for analyzing changes in business activity.
There are two approaches to preparing these journal entries. Please see this article to read more about each option.
What are open transactions?
Open transactions are activities that are midway through their respective business process. For example, an unpaid vendor bill is incomplete because it still needs to be paid. Examples of open transactions are:
-
Sales orders
-
Purchase orders
-
Customer invoices
-
Vendor bills
-
Uncleared bank transactions (for the beginning bank reconciliation)
-
Inventory items on hand
These items might need to be loaded to begin transacting in the accounting system. You won't be able to start using NetSuite without entering these transactions correctly. Understanding how to load these transactions without creating errors on your historical financial statements is essential.
What do you need before loading financial data into NetSuite?
You should complete the following before preparing your historical financials:
-
Loaded all segment master records, including general ledger (GL) accounts, departments, classes, locations, and items
-
Loaded all relational master records, including customers, vendors, and employees
-
Create suspense accounts and a fictitious customer/vendor record (see below for an explanation) to prevent a no vendor/customer line on your subledger reports.
-
Confirm with your implementation team that the system is ready for loading financial data.
-
Close the financial period in your legacy system, including addressing some of these frequent cleanup items.
I recommend that you lock periods in the legacy system to prevent changes. If you fail to do this, you risk a new or updated transaction in the legacy system will get posted without being reflected in the new system. This error will create a reconciliation nightmare that can be painful to fix.
Why must I use a fictitious customer/vendor for the lines impacting accounts receivable (AR) and accounts payable (AP)?
Any transaction that impacts a sub-ledger account, like AR or AP, creates a line on the detailed sub-ledger report. Most native NetSuite transactions require a customer or vendor name on the transaction. However, journal entries do not. This feature creates an opportunity for users to inadvertently create a 'No Vendor' or 'No Customer' line on their detailed subledger report with no way to remove it.
.png?width=941&name=Example%20No%20Vendor%20AP%20Aging%20Detail%20(1).png) Our historical financial statement journal entries create a unique situation. We prepared these journals at a summary level. However, subledger transactions are at a detailed level. Therefore, to prevent this error, we make a fictitious customer and vendor on the summary level information. Then, when loading the open transactions, we will reverse the balance. When done correctly, the fictitious entity's balance is zero after loading the historical data.
Our historical financial statement journal entries create a unique situation. We prepared these journals at a summary level. However, subledger transactions are at a detailed level. Therefore, to prevent this error, we make a fictitious customer and vendor on the summary level information. Then, when loading the open transactions, we will reverse the balance. When done correctly, the fictitious entity's balance is zero after loading the historical data.
How to load historical financials and open transactions
Key assumptions in our example
Below are the assumptions for the example:
-
The client, ABC Company, is going live with NetSuite on 2/1/2020. ABC Company previously used QuickBooks Online (QBO).
-
ABC Company plans to load the January 2020 historical financials as a journal entry. They are using the point-in-time approach described in this article.
-
ABC Company mapped the QBO GL account to the NetSuite GL account and department segments. See the screenshot below as an example:
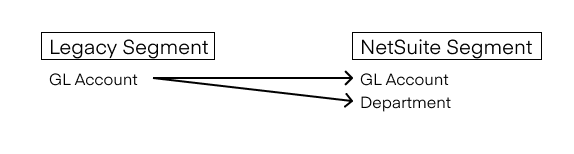
We must assign a NetSuite GL account and a department for each GL account in the legacy system.
-
ABC Company only has open accounts payable (AP) transactions in scope for the project.
This straightforward example will demonstrate the debits and credits for loading your historical financial statements and open transactions. Let's get started!
1. Run and format the legacy trial balance (TB) report
The first step is to run a TB report in your legacy system. Below is ABC's file:
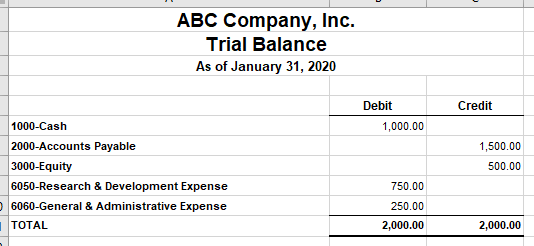 Get the data into a tabular format by removing any headers and footers. Once you've done that, we will add the NetSuite segment values.
2. Add the necessary NetSuite segments
Remember above that we assume ABC Company is using the QBO GL account to map to the NetSuite GL account and NetSuite department. Below is what their segment map file might look like:
 Use an XLOOKUP formula to add the NetSuite segment value based on the legacy GL account.
Next, we must add our fictitious vendor to the accounts payable lines. See above for an explanation of why this is a critical step.
Finally, we also need to add fixed field values to our spreadsheet. Examples of these might include:
-
The subsidiary
-
The date
-
A transaction number or external ID field
-
A header and line memo description
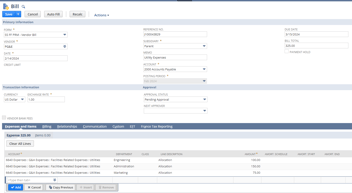
Here is what the final journal entry upload file should look like:

For reference, here is the summary journal entry in text form:
| Account | Department | Name (entity) | Debit | Credit |
|---|---|---|---|---|
| Cash | Admin | — | X | |
| Accounts Payable | Admin | Fictitious Vendor | X | |
| Retained Earnings | Admin | — | X | |
| (continue for each mapped account) |
3. Upload the financial statements as a journal entry
We will load the journal entry once your trial balance report has the correct NetSuite segments. Go to Setup → Import/Export → Import CSV Records to navigate the CSV upload page. Select Transactions under the Import Type dropdown and Journal Entry under the Record Type dropdown. You can purchase our CSV template guide here.
A few pointers when using the CSV upload functionality:
-
Your NetSuite implementation partner can provide the upload templates by transaction type.
-
I recommend loading a single transaction first when loading a large volume of transactions. You want to validate the upload worked as expected. It is much easier to correct one transaction manually. Also, always confirm the transaction didn't get caught up in an approval workflow.
-
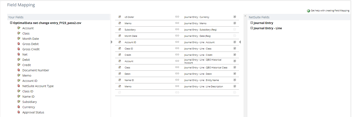
Don't forget to adjust the upload file on the Field Mapping page to map based on the name or internal ID. I recommend using the internal ID for mapping files.
Most likely, these will fail the first few times. Keep at it! Do your best to decipher the error codes. It took me a few times to get it right, too.
4. Prepare and load the open transactions
I've written extensively about loading open transactions. For step-by-step instructions, please check out these other articles:
Before moving on to the validation process, confirm that any suspense account used has a zero-dollar balance.
5. Validate the upload process
After completing the open transaction load, you can validate that your data migrated accurately. At a minimum, I'd recommend completing a trial balance tieout and a subledger tieout at the go-live date. First, check with your financial statement auditors to confirm what they need to get comfortable with the implementation process. Check out this article for more tips on preparing audit documentation related to a NetSuite implementation.
What else should you plan for (subsidiaries, currency, timing)?
The example provided here was intentionally simple. Here are a few additional considerations that might apply to your specific situation:
-
You will need to complete this for each subsidiary you migrate to NetSuite. Journal entries can only have a single subsidiary.
-
The historical financial statement journal entry should be in the subsidiary's reporting currency. You should load the open transactions with the functional currency of the original transaction. Use the exchange rate on the original transaction to ensure that the fictional subledger entity nets to zero.
-
I recommend loading your historical financial statement journal entries in two batches. The first batch should be through a locked period, such as your last audited financial statement date. Splitting the work into two sets will provide two benefits. First, you reduce the amount of work at the go-live date. Second, you get some practice preparing and loading the data.
-
If your go-live date is on a month-end (i.e., February 1st), there might be a timing gap between when you close the January books and import your financial data. I recommend factoring this gap into your planning, especially if you decide to close your legacy system cleanly.
Frequently asked questions
Can you load detailed transaction history instead of summary balances?
Yes. This article covers the summary-level approach, where historical results load as a single journal entry. If you need transaction-level detail for audit or reporting, that is a separate detailed-import process. See our full transaction import case study for that approach.
How do you keep the fictitious customer/vendor from distorting your reports?
Assign the fictitious entity to the AR/AP lines of the summary journal entry, then reverse that balance when you load the individual open transactions. When done correctly, the fictitious entity nets to zero, leaving no residual line on your subledger reports.
When should you load historical financials during a NetSuite implementation?
Load historical financials after all master records (accounts, departments, customers, vendors, items) are in place and the legacy period is closed and locked, and shortly before go-live. Loading in two batches, with the first through your last audited period, reduces go-live workload.
How do you confirm the migration was accurate?
Complete a trial balance tie-out and a subledger tie-out at the go-live date, and confirm any suspense account has a zero balance. Check with your auditors first to confirm what documentation they need.
Closing
The financial data migration step is one of the final steps before going live in your new accounting system. It is essential to get this step right to start transacting. Be sure to allocate plenty of time to completing this process.
If you or your team needs additional assistance, you should consider:
-
Signing up for OptimalData's QuickBooks Online to NetSuite data migration course. This online class will take you step-by-step through the data migration process.
-
Contact OptimalData to load and validate your data, including all your historical transactions.