Implementation, CSV Uploads, GL Accounts
19 min Read
How to Import a Chart of Accounts from QuickBooks to NetSuite
To import your chart of accounts from QuickBooks to NetSuite, export the account list from QuickBooks, reshape it into a CSV file with Number, Name, Account Type, Currency, Subsidiary, Include Children, and Parent columns, then load it through Setup → Import/Export → Import CSV Records. The work is in the reshaping. NetSuite uses different account type names than QuickBooks, handles account numbers through a system-wide preference, and enforces subsidiary and currency rules that QuickBooks has no concept of.
The chart of accounts is the first master record I load in a QuickBooks-to-NetSuite migration because everything downstream inherits its structure. Transactions, segment mapping, and trial balance tie-outs all depend on getting this right the first time.
TL;DR
- Account numbers in NetSuite are controlled by the Use Account Numbers preference. Enable it before you import, or the Number column in your CSV has nothing to map to.
- Account type names differ between QuickBooks Online, QuickBooks Desktop, and NetSuite. Every type must be mapped before the CSV will load.
- Map subsidiary, currency, and parent account by internal ID rather than name to avoid exact-match failures.
- Import parent accounts first, capture their internal IDs, then import each level of sub-accounts in a separate file.
- Use NetSuite's system-generated accounts rather than importing duplicates alongside them, and check whether the legacy system's equivalents have been repurposed.
- Do not set a currency on any account other than Bank and Credit Card. That setting cannot be changed after the account is created.
How is the NetSuite chart of accounts different from QuickBooks?
The differences come down to one thing: NetSuite is built for multiple subsidiaries and multiple currencies, and QuickBooks is not. That single design decision drives almost every mapping problem you will hit.
Here are the differences that matter most when you prepare the import file:
- Subsidiary and currency restrictions. NetSuite allows Bank and Credit Card accounts to be assigned to a single subsidiary and a single currency. QuickBooks has no concept of a subsidiary, so nothing in your export will tell you which subsidiary an account belongs to. You have to decide.
- Currency-specific AP and AR accounts. QuickBooks creates separate accounts payable and accounts receivable accounts for each currency. NetSuite allows this but does not require it. I do not recommend setting the currency on any GL account beyond Bank and Credit Card, because you cannot change that setting after the account is created.
- Cumulative translation adjustment. NetSuite calculates cumulative translation adjustment (CTA) amounts between parent and child subsidiary records. That calculation depends on the General Rate Type set on the account record, a field QuickBooks does not have.
- Account numbers. Both systems treat account numbers as optional, but NetSuite controls them with an account-wide preference rather than leaving the choice to each account. See the numbering section below.
- Detail types. QuickBooks requires a detail type for each account. NetSuite does not, so this column gets deleted.
- Account type names. The names vary between QuickBooks Online, QuickBooks Desktop, and NetSuite. See the account type mapping table below for the full equivalents.
For more on how GL accounts fit alongside departments, classes, and locations, see my article on NetSuite segment structure.
What are the QuickBooks to NetSuite account type equivalents?
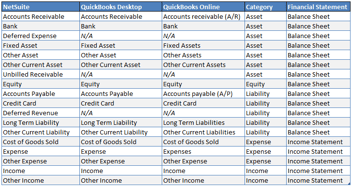
Every QuickBooks account type maps to a NetSuite account type, but the names do not always match. QuickBooks Desktop type names are identical to NetSuite's. QuickBooks Online is the one that needs work: its interface uses plural forms and parenthetical abbreviations, whereas NetSuite uses the singular form. Use this table to rename the Account Type column in your import file.
| QuickBooks Online | QuickBooks Desktop | NetSuite | Statement |
|---|---|---|---|
| Assets | |||
| Accounts receivable (A/R) | Accounts Receivable | Accounts Receivable | Balance Sheet |
| Bank | Bank | Bank | Balance Sheet |
| Fixed Assets | Fixed Asset | Fixed Asset | Balance Sheet |
| Other Assets | Other Asset | Other Asset | Balance Sheet |
| Other Current Assets | Other Current Asset | Other Current Asset | Balance Sheet |
| No equivalent | No equivalent | Deferred Expense | Balance Sheet |
| No equivalent | No equivalent | Unbilled Receivable | Balance Sheet |
| Liabilities | |||
| Accounts payable (A/P) | Accounts Payable | Accounts Payable | Balance Sheet |
| Credit Card | Credit Card | Credit Card | Balance Sheet |
| Long Term Liabilities | Long Term Liability | Long Term Liability | Balance Sheet |
| Other Current Liabilities | Other Current Liability | Other Current Liability | Balance Sheet |
| No equivalent | No equivalent | Deferred Revenue | Balance Sheet |
| Equity | |||
| Equity | Equity | Equity | Balance Sheet |
| Income | |||
| Income | Income | Income | Income Statement |
| Other Income | Other Income | Other Income | Income Statement |
| Expenses | |||
| Cost of Goods Sold | Cost of Goods Sold | Cost of Goods Sold | Income Statement |
| Expenses | Expense | Expense | Income Statement |
| Other Expense | Other Expense | Other Expense | Income Statement |
| Non-financial | |||
| No equivalent | No equivalent | Statistical | n/a |
A note on the NetSuite types with no QuickBooks equivalent. Deferred Expense, Unbilled Receivable, and Deferred Revenue are usually tracked in QuickBooks as Other Current Asset or Other Current Liability, so decide during mapping whether to reclassify them into the more specific NetSuite type or carry them across as-is. Statistical accounts are not part of a QuickBooks chart of accounts export and should be created directly in NetSuite if you need them.
If you are pulling the QuickBooks Online account list via the API rather than the Account List report, the account types are already returned in singular form, matching NetSuite. Check which form your export used before you start renaming.
How do you export your chart of accounts from QuickBooks?
Export the legacy chart of accounts before you make any design decisions. The exported file is the working document: it is what the client reviews, what the future state chart gets built alongside, and what your eventual mapping file is anchored to. Designing a new chart of accounts without the current one in front of you is how accounts get missed.
The export path differs between QuickBooks Online and QuickBooks Desktop. Use the one that matches your legacy system.
QuickBooks Online
Export the Account List report rather than working from the Chart of Accounts screen. The report gives you a clean tabular file that is far easier to reshape into the NetSuite import template.
- Go to Reports in QuickBooks Online.
- Under Standard Reports, search for Account List.
- Open the report. It will default to the modern view.
- In the top-right corner, click Customize or Filters, then check the Deleted filter. You want deleted accounts excluded, so that you are working from the active legacy account list.
- Confirm the report now shows the full active account list.
- Click Save As, name the report Legacy Account List, and click Save.
- Click the export icon (the square with the arrow) and choose Export to Excel.
- Save the file using a consistent naming convention, such as [Client Name] - Legacy COA.xlsx.
Saving the report is worth the extra click. You can rerun it on cutover day to catch any accounts the client's team created after the first export.
QuickBooks Desktop
- Open QuickBooks and go to Lists > Chart of Accounts.
- Click the Excel button at the bottom of the window and choose Export to Excel.
- Save the file to your computer using the same naming convention.
How should you number a NetSuite chart of accounts?
Account numbers in NetSuite are optional, and whether they exist at all depends on a single preference: Use Account Numbers, found under Setup → Accounting → Accounting Preferences on the General subtab. With it disabled, accounts are identified by name only. With it enabled, every account record carries a Number field.
Turn it on. Numbered accounts sort predictably in reports, give you a stable key for mapping legacy accounts to NetSuite accounts, and are what most controllers and auditors expect to see. The reason to settle this before the import, rather than after, is mechanical: if the preference is off, the Number column in your CSV has nothing to map to, and adding numbers later would require an update import across the entire chart of accounts.
QuickBooks also treats account numbers as optional. If your client has been running without them, you are assigning numbers from scratch, and this is the moment to do it deliberately rather than sequentially. Here is the standard convention I use when a client has no existing scheme:
- 1xxx Asset accounts
- 2xxx Liability accounts
- 3xxx Equity accounts
- 4xxx Income accounts
- 5xxx Cost of Goods Sold accounts
- 6xxx Expense accounts
- 8xxx Other Income accounts
Leave gaps between numbers. If you number your operating expense accounts 6001, 6002, 6003, the first new account the client adds after go-live breaks the ordering. Numbering in tens or hundreds gives the client room to grow without a renumbering project later.
Numbering is the mechanical half of this. The structure itself is a judgment call and closer to art than to science. There is no single correct chart of accounts, only one that matches how the client actually reports, closes the books, and answers questions from their board and their auditors. Two companies in the same industry can land on legitimately different structures, and both be right.
What makes this worth pushing on early is that the chart of accounts is one of the first things the implementation team needs. Segment design, sandbox configuration, and every downstream data load wait on it. I have watched a client spend close to 9 months redesigning their chart of accounts, which significantly delayed the project. The redesign itself was real work and worth doing. The open-ended timeline was the problem.
If the client is restructuring, set a decision date and treat it as a project milestone rather than an internal goal. Step 1 below covers the three ways this usually plays out.
How do you import a QuickBooks chart of accounts into NetSuite?
Five steps, in order. Steps 3 and 4 are where most first-time imports go wrong.
1. Agree on the future state chart of accounts
Working from the exported legacy chart, settle with the client what the NetSuite chart of accounts should actually look like. In practice, it falls into one of three buckets:
- No changes. Everything is a one-to-one match with the legacy system. Move straight to step 2.
- Minimal changes. Mostly the same, with some renaming or renumbering.
- Complete restructure. A new account structure that does not resemble the legacy chart.
If the client is making significant numbering or naming changes, build the future state chart in Excel alongside the legacy export and track the legacy-to-future mapping in the same file. That mapping file is what every downstream transaction load depends on, so it is worth the time to update it. See this article on preparing a segment map file.
Have the client review and approve the future state chart before you prepare a single CSV. Rework at this stage is cheap. Rework after the transactions are loaded is not.
2. Prepare your CSV import file
Open the exported file, delete the columns NetSuite does not use (Description, Balance, Detail Type), and rename the rest to match the NetSuite import template. These are the columns you need:
- Number. Only available if the Use Account Numbers preference is enabled. See the numbering section above.
- Name. The account name.
- Account Type. Renamed to the NetSuite equivalent using the mapping table above.
- Currency. Required for Bank and Credit Card accounts. Leave blank for everything else.
- Subsidiary. Bank accounts belong to a single subsidiary. For all other account types, set this to the top-level subsidiary.
- Include Children. Set to True for all account types except Bank accounts.
- Parent GL account. Only for sub-accounts. See step 4.
Then save the file as a CSV.
One habit that saves a lot of failed imports: map subsidiary, currency, and parent account by internal ID rather than by name. Name matching requires the value to be exact, whereas internal ID matching does not. This article covers how to reveal internal IDs on all NetSuite lists.
Two situations are worth handling here rather than cleaning up later. For intercompany accounts, check the Eliminate Intercompany Transactions box and check Include Children where applicable. For accounts belonging to foreign entities, leave the Currency field blank unless the subsidiary genuinely requires it.
3. Replace the system-generated accounts
Every new NetSuite instance ships with a set of default accounts. Use them rather than importing duplicates alongside them.
The clearest example is the generic Checking account NetSuite creates automatically. Rename it to the client's primary bank account instead of importing a second bank account and leaving an unused Checking account in the chart forever. Do the same for the other defaults, then remove those accounts from your import file. Oracle publishes the full list of system-generated accounts.
Repurposing a system-generated account is a different matter, and it causes problems that surface late. This applies to the legacy system just as much as it applies to NetSuite. Retained earnings is where it bites most often, and the symptom shows up during tie-out rather than during mapping. See the FAQ below for what that looks like.
4. Import parent accounts first, then each level of children
If the client uses NetSuite's parent-and-child account hierarchy, this is not a single import. It is one import per level.
- Import every account that has no parent.
- Pull the internal IDs of those newly created parent accounts out of NetSuite and add them to your support file.
- Import the first level of sub-accounts, referencing the parent by internal ID.
- Repeat for each additional level: grandchildren, great-grandchildren, and so on.
Capturing the internal IDs between each upload is the step people skip. Without it, the child import has nothing reliable to point at, and you end up matching on account name.
The import itself runs through Setup → Import/Export → Import CSV Records. The chart of accounts import is the default record type on that page. Select your file, follow the prompts to map your fields, and run the import. If you are new to the tool, this overview of the NetSuite CSV Import tool covers the mechanics, and Oracle's chart of accounts import documentation covers the record-specific fields.
5. Validate the import
Before you move on to transactions, confirm three things:
- Every account from the approved future state chart exists in NetSuite.
- The parent and child hierarchy renders correctly, at every level.
- Bank and Credit Card accounts carry the right subsidiary and currency, and Include Children is not set on them.
Fixing a mis-typed account now takes one update import. Fixing it after 50,000 transactions have posted to it takes considerably longer.
Frequently asked questions
Does NetSuite require account numbers?
Not by default. Account numbers are controlled by the Use Account Numbers preference under Setup → Accounting → Accounting Preferences. With the preference disabled, NetSuite identifies accounts by name only, and the Number field does not appear on the account record. With it enabled, every account carries a number. Most implementations turn it on, because numbered accounts sort predictably in reports and give you a stable key for mapping legacy accounts. Enable the preference before you run the chart of accounts import, since the Number column in your CSV has nothing to map to otherwise.
Can you change a GL account's currency in NetSuite after it is created?
No. The currency setting on a NetSuite GL account is locked once the account record is created. This is why I recommend leaving currency blank on every account type other than Bank and Credit Card, where NetSuite requires it. Setting a currency you do not need means creating a replacement account and reposting anything that hit the original account.
How do you import parent and child accounts in NetSuite?
Import them in separate files, one per level of the hierarchy. Load all accounts without a parent first, then retrieve the internal IDs of those new parent accounts from NetSuite, add them to your support file, and load the first level of sub-accounts referencing the parent by internal ID. Repeat for each additional level. A single combined file will fail because the child records reference parents that do not exist yet.
What happens to inactive or deleted QuickBooks accounts?
Filter them out of the export before you build the import file. Deleted and inactive accounts carry historical balances but no future activity, so importing them permanently clutters the chart of accounts. The exception is when you are migrating detailed historical transactions that posted to those accounts. In that case, import the account, load the transactions, then mark the account inactive in NetSuite.
Should you use NetSuite's default accounts or import your own?
Use the defaults. Every new NetSuite instance is created with a set of system-generated accounts, and the cleanest approach is to rename each one to the client's equivalent and exclude it from your import file. Importing a parallel account instead leaves an unused system account permanently in the chart of accounts, and NetSuite will still post to it automatically in certain transaction flows. What you should never do is repurpose a system account for an unrelated purpose.
Why doesn't retained earnings tie after a QuickBooks to NetSuite migration?
The most common cause is a difference in how each system handles the year-end close. QuickBooks and NetSuite both generate a retained earnings account and roll profit and loss activity into it automatically. If the legacy chart of accounts has no retained earnings account, or the client renamed or replaced it with a custom equity account, QuickBooks closes to that custom account, while NetSuite closes to its own. The result is a variance where retained earnings and equity offset each other by an identical amount. NetSuite is usually correct in this scenario, so the fix is to document the difference in your tie-out rather than adjust the balance. Checking how the legacy system handles retained earnings before you map the chart of accounts saves finding this during go-live week.
Should you redesign your chart of accounts during a NetSuite migration?
It is a common and often worthwhile decision because implementation is the cheapest time to make structural changes. The tradeoff is that every historical transaction you migrate has to be remapped to the new account structure, so the mapping file becomes critical. Decide before the export, not midway through the transaction load.
Is the CSV import worth it for a small chart of accounts?
If there are fewer than about five accounts to create, I create them manually in the NetSuite user interface. Below that threshold, building and validating a CSV file takes longer than typing the records. The CSV import earns its keep for full chart of accounts loads and for any hierarchy with parent-child relationships.
What to do after your chart of accounts is imported
The chart of accounts is the foundation on which the rest of the migration sits. Segment values, transaction mapping, and the trial balance tie-outs your auditors will eventually ask for all resolve back to these account records. Mistakes here do not stay contained, which is why the client review in step 1 and the validation in step 6 matter more than they look.
With accounts loaded, the next decisions are which client segments are needed and how much transaction history to bring across. This article on importing historical financial transactions addresses the second question, which is usually the more consequential.
Contact OptimalData Consulting if you want to hand the data migration to a specialist, or migrate detailed transaction history from QuickBooks into NetSuite. You can also browse our NetSuite implementation resource page for more guides like this one.
Paul Giese
Paul Giese is the founder of OptimalData Consulting, a firm specializing in NetSuite data migration for companies moving off QuickBooks, Sage, Great Plains, Xero, and other legacy systems. He has over a hundred migrations focused on preserving detailed transaction-level history for audit readiness, financial reporting, and post-acquisition continuity.
LinkedIn