NetSuite, Implementation, Data Migration
February 19, 2024
8 min Read
Introduction
This article is a comprehensive guide on importing vendor bills in NetSuite using a CSV import template. The article discusses use cases for importing vendor bills, understanding the default vendor bill form, the required fields, and how to map bill fields in the CSV template.
This is part of an OptimalData series on CSV imports. See my overview article for more general tips on using NetSuite CSV templates.
Use Cases for Importing Vendor Bills
Here are a few scenarios where users might want to import vendor bills into NetSuite with a CSV import template:
-
Historical Data Migration: When implementing NetSuite from QuickBooks or another system, users must import open vendor bills to transact in NetSuite. See my article on loading open accounts payable for additional information on this NetSuite data migration task.
-
Legacy Ordering System: When I implemented NetSuite in 2016, we had an old purchasing system that we planned to replace eventually. Rather than investing the resources to build an integration, I exported the approved vendor bills from the purchasing system and imported them into NetSuite.
-
Large Vendor Bills: I’ve seen clients that allocate specific bills across multiple departments or classes. One vendor bill had 50 lines. Rather than manually entering this bill, you could allocate it in Excel and import it.
Understanding the NetSuite Vendor Bill
Before preparing your CSV file for import, it is essential to understand the vendor bill transaction type. Vendor bills represent money that you owe a vendor. When you enter a vendor bill, you create a liability in the assigned Accounts Payable account type. Eventually, you either pay the vendor bill with a vendor payment transaction or issue a vendor credit, reversing the expense.
Below is a screenshot of an example vendor bill:
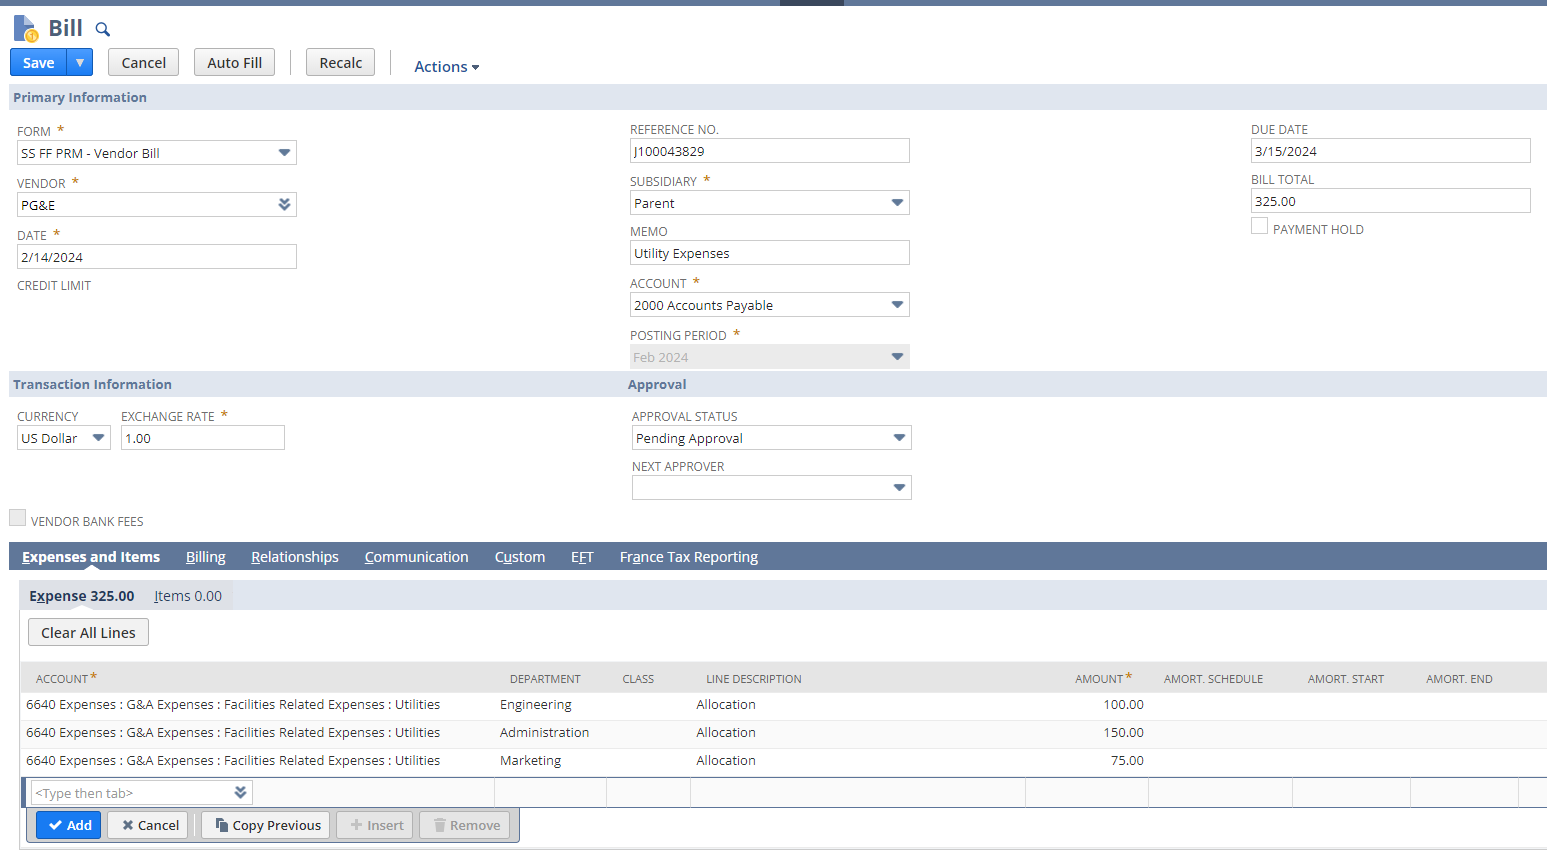
The Vendor Bill Form:
The view users see when entering a vendor bill in NetSuite is called the form. This is how administrators and implementation partners set custom fields, change the required fields, and change the placement of fields. The above screenshot shows the form dropdown in the top left corner, where a user can change the form. It is critical to understand that the selected form drives the required fields on the user interface and in the CSV import status.
Header-Level vs. Line-Level Data
Similar to other transactions, users should understand the difference between header-level and line-level data on the vendor bill:
-
Header-Level Data: Contains information that applies to the entire vendor bill, such as the date, the vendor, and the subsidiary. This data appears once on the form, typically on the top portion of the page.
-
Line-Level Data: Represents fields on each line of the vendor bill. Every line will have its account, department, debit, and credit amounts.
Vendor bills have two sets of potential line-level data - expenses and items. Expenses allow you to post directly to a GL account. Items link to specific items in your item master list. Regarding the CSV import template, you’ll want to set a different “Amount” column for the item and expense information if you plan to utilize both on the same import.
There is a one-to-many relationship between the header and the lines. Each bill line shares the same header information. You can see that in the screenshot above. There are two journal entry lines on the journal entry.
Understanding this distinction determines how you format your import file in the CSV import template.
Vendor Bill Fields:
Now, let's discuss the vendor bill fields. Every company will have different required fields. An asterisk will indicate if the field is required. Include a column in the CSV import template if a field is required.
Here are some standard header fields:
-
Vendor: The vendor is the first field you complete. This represents the entity associated with the vendor bill.
-
Subsidiary: The subsidiary is the legal entity that owes the vendor. NetSuite won’t allow you to select a subsidiary not assigned to the vendor. The bank account must be associated with the selected subsidiary when paying the vendor bill.
-
Date: The transaction date of the bill.
-
Period: The posting period in which the bill’s GL impact will be included. See my article on the date and period for additional details.
-
Currency: If applicable, include the currency code. The default currency is based on the vendor’s currency.
-
Exchange Rate: Defaults to 1 if you select the subsidiary’s reporting currency. Otherwise, it will use the exchange rate from the system.
-
Account: This is the accounts payable account you want the vendor bill to post to. This account is only available if you have multiple accounts payable account types.
-
Memo: A brief description of the entry. This field is called the Memo (Main).
Here are some standard expense line fields:
-
Account: The account affected by the entry (e.g., “Software Expenses”).
-
Department/Class/Location: The appropriate segment value that is assigned to the entry line.
-
Amount: The amount you want allocated to the expense line.
-
Memo/Description: A line-level description on the entry line.
-
Project/Job: Users can configure NetSuite to track job expenses on vendor bill lines. Talk to your implementation partner or administrator for details on configuring this in your NetSuite instance.
Here are some standard item line fields:
-
Item: The item that is being purchased. Must link to an existing item on the master item list.
-
Quantity: The quantity of items being purchased.
-
Rate: The cost per item being purchased.
-
Amount: Either a calculation of the quantity times the rate. Or, you can override the amount. You’ll get an error message confirming that you want the amount to differ from the quantity times the rate.
-
Department/Class/Location: The appropriate segment value that is coded to the entry line.
Mapping Vendor Bill Fields in the CSV Template
You can prepare the CSV file once you understand the field layout for the vendor bill form. I’d recommend opening a new Excel file and manually adding the columns you want to be populated on the vendor bill, including all required fields. For a guided example, you can also purchase my transactional CSV import guide for $50.
Preparing the CSV template with your data will be the hard part. Take your time, and make sure you populate the required fields.
Below is a completed vendor bill import example. Notice how the header-level fields all repeat on the line-level fields.
Also, notice that I map fields on the internal ID instead of the name. See my overview article for more details on why I do this. Here is the complete list of fields you can use with the internal ID on the vendor bill import template:
-
Vendor
-
Subsidiary
-
Currency
-
AP Account
-
Line Account
-
Department/Class/Location/custom segments
-
Items
.png?width=1335&height=188&name=Vendor%20Bill%20CSV%20import%20template%20example%20upload%20file%20(1).png)
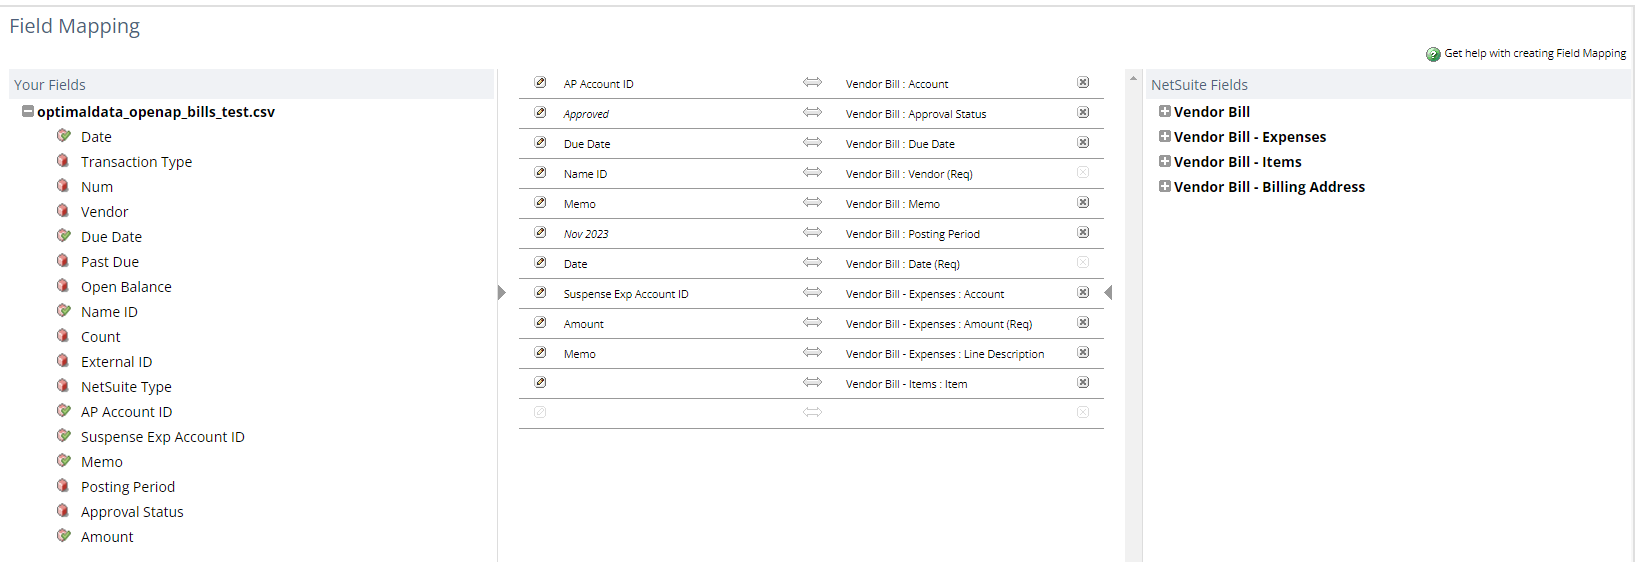
Example Vendor Bill Field Mapping
On the Field Mapping step of the CSV Import Tool, you will assign the column names in your import template to the corresponding field in NetSuite. The CSV file column names are in the left window, the mapping section is in the middle window, and the NetSuite field names are in the right window. Mapped fields share a row in the middle.
Below is an example of field mapping for a vendor bill.
Here are a few observations:
-
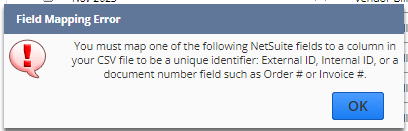
Users must map an external ID or document number field. If you don’t, you’ll receive the below error message:
-
The expense line-level fields always start with the “Vendor Bill - Expenses” prefix, and the item line-level fields always start with the “Vendor Bill - Items” prefix.
-
The “Vendor Bill - Items: Item” field will always appear on the field mapping page. If you aren’t using items, you can delete this by clicking on the small X on the right side of the middle window.
-
NetSuite will attempt to map the fields automatically based on the name. Confirm on the map file that the “Amount” column is mapped to the correct amount field. For example, if you use only the expense lines, make sure the Amount column is mapped to the “Vendor Bill - Expenses: Amount” field, not the “Vendor Bill - Items: Amount” field.
-
Any mapped field from your spreadsheet will have a green checkmark to indicate it has been mapped.
Additional Considerations
Here are some additional considerations when importing vendor bills:
-
The system notes subtab will track that the vendor bill was created via CSV on the “Context” column.
-
If you have a vendor bill workflow, test how the CSV imports interact with the workflow.
-
Before loading a large volume of transactions, load a test transaction first.
Conclusion
In conclusion, importing vendor bills in NetSuite using a CSV import template can significantly streamline entering and managing bills. This comprehensive guide has covered various aspects, including the use cases for importing vendor bills, understanding the vendor bill form, and mapping vendor bill fields in the CSV template. Importing vendor bills via CSV can be a powerful tool for enhancing efficiency and accuracy in financial management.
Here are some other ways I can help you if this article was helpful:
-
Sign up for my accounting saved search course
-
Hire me to complete the required NetSuite implementation data migration. Contact me for a free quote.
-
Check out my CSV tool overview article.


.png?width=352&name=NetSuite%20CSV%20Import%20Tool%20(1).png)