
NetSuite, Data Migration, CSV Uploads
July 16, 2026
5 min Read
To import historical trial balances when re-implementing NetSuite, build a transaction saved search that summarizes posting activity by accounting period, export it to Excel, and load it as balanced journal entries via CSV import. Here's the full process.
TL;DR
- Import historical trial balances as summarized journal entries — one balanced entry per accounting period — built from a NetSuite transaction saved search.
- Group the saved search by Period and Account; set Debit and Credit to Sum.
- Tag any AR/AP lines with a fictitious "AR Import Customer" / "AP Import Vendor" so the subledgers reconcile.
- Confirm debits and credits net to zero per document number, then tie out trial balances between the old and new systems.
When does a NetSuite re-implementation require importing historical trial balances?
A NetSuite-to-NetSuite transition is the third-most common NetSuite data migration project we see. Scenarios where this transition applies include:
-
A client has an older NetSuite instance without OneWorld. For example, I had an Illinois-based IT reseller in this exact situation. They had expanded their business and now needed multiple subsidiaries with OneWorld.
-
A client acquires another company that is running on NetSuite.
-
A client wants to implement a new instance with additional functionality. For example, I had an Arizona-based solar client implement Blu Banyan’s SolarSuccess program. This required them to reimplement NetSuite.
When reimplementing NetSuite, the data migration strategy mirrors transitioning from any other system. Organizations must import master records, historical trial balances (TBs), and open transactions. This article discusses building a NetSuite saved search to prepare the historical trial balances during the data migration project.
What do you need in place before importing historical trial balances?
Before we get started with loading the historical financials, you’ll want to complete the following:
-
Create the master records in the new NetSuite instance. Ideally, set the new NetSuite instance's external ID value to the old NetSuite instance’s internal ID value when creating these master records. This simple trick will make the mapping exercise significantly easier.
-
Generate the fictitious "AR Import Customer" and "AP Import Vendor" for tagging journal entry lines that impact Accounts Receivable (AR) and Accounts Payable (AP) accounts
-
Confirm that the accounting periods you are loading in the new system have been created and are open for the new subsidiary.
-
Validate that the account periods in the old system are locked to avoid changes to the historical financial data.
Once these steps are complete, you are ready to prepare the journal entry import template.
How do you build a saved search for historical trial balances in NetSuite?
1. Create a transaction saved search
Navigate to Reports → New Search. Scroll to "Transaction" and click "Create Saved Search." Provide a meaningful name like "Summary TBs by Month."
2. Add the appropriate filters
Add appropriate filters in the Criteria subtab. Set "Posting" criteria to "Yes" to exclude non-posting transactions.
NetSuite generates financial statements based on the posting period, not the date. Select the Accounting Period range. Options include:
- Select "Period" criteria and manually select each fiscal year
- Select "Accounting Period…" criteria, select "Internal ID (Number)," and select the accounting period range (found on the Manage Accounting Periods page with internal ID settings checked; only works if accounting period internal IDs are sequential)
3. Add the appropriate columns
Set appropriate columns in the "Results" subtab. At minimum, include:
- Period
- Account
- Debit
- Credit
- Any other segment values (Department, Class, Location, Subsidiary)
Since NetSuite prepares financial statements by accounting period, group the data by period. Find the "Summary Type" dropdown and set all fields to "Group" except the "Debit" and "Credit" fields, which should be set to "Sum."
If the legacy NetSuite instance's internal ID was included as the external ID in the new instance, also include the internal ID for the account and segments.
Once columns are finalized, click "Save & Run" and export the results to Excel.
4. Prepare the NetSuite CSV import template in Excel
Begin preparing the journal entry import file with several required changes:
- Add a date column based on the "Period" column
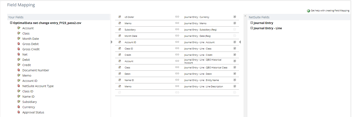
- Map the segments (skip if the external ID was included in the new instance)
- Add "Import AR Customer" and "Import AP Vendor" names to rows for any line impacting Accounts Receivable or Accounts Payable account types
- Add a document number and external ID for each journal entry using a CONCATENATE formula; recommended nomenclature: "[MONTH]-[YEAR]-[SUBSIDIARY ID]-TB"
Validate that debits and credits sum to zero by document number. Save the file as CSV.
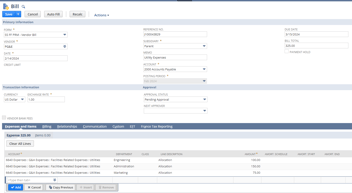
5. Upload the entries into NetSuite
Upload the journal entry import template by navigating to Setup → Import/Export → Import CSV Records. For upload errors, consult our article on solutions to common CSV import errors. After loading the entries, validate balances by comparing trial balances between systems.
For additional help importing journal entries, consider enrolling in the saved search course for accountants. After this step, proceed to load open accounts payable and open accounts receivable transactions.
Frequently asked questions
Should historical trial balances be imported as summarized or detailed entries?
Import them as summarized journal entries — one balanced entry per accounting period — rather than replaying every legacy transaction. A saved search grouped by period gives you auditable balances that tie out to the old system without the volume and errors of a full transaction-level reload.
How do you handle AR and AP balances in a trial-balance import?
Tag any journal entry line hitting an Accounts Receivable or Accounts Payable account with a fictitious "AR Import Customer" or "AP Import Vendor." NetSuite requires a customer or vendor on those lines, and using a dedicated import entity keeps the migrated balances separate and easy to reconcile later.
Why does the saved search group by accounting period instead of date?
NetSuite builds financial statements from the posting period, not the transaction date. Grouping the saved search by accounting period ensures your imported trial balances match how NetSuite will report them, so the new system reconciles to the old one.
How do you confirm the imported trial balances are correct?
Validate that debits and credits net to zero per document number before importing, then compare the trial balance in the new instance against the legacy system period by period. Matching balances confirm the import is complete and correct.
Key steps for importing historical trial balances into NetSuite
Importing historical trial balances cleanly comes down to one principle: let NetSuite's posting periods drive the data. A saved search grouped by period gives you balanced, auditable journal entries that tie out to the legacy system — far safer than replaying raw transactions. Once your trial balances reconcile, the next step is loading open AP and AR transactions.
If you'd rather hand the migration to a team that has done it 100+ times, contact OptimalData and we'll help you scope it.


.png?width=352&name=NetSuite%20CSV%20Import%20Tool%20(1).png)