NetSuite, Implementation, Data Migration, QuickBooks
December 8, 2025
7 min Read
Introduction
The best way to load historical financial statements during a NetSuite implementation is with a journal entry import. There are two methods to prepare these journal entries:
-
The net change entry approach
-
The point-in-time approach
OptimalData uses both approaches. Below, I break both approaches down, explain the pros/cons, and share when I recommend each.
For illustration purposes, let's assume that Company ABC is migrating data from QuickBooks to NetSuite. Their NetSuite implementation go-live date is 5/1/2022. The organization has QuickBooks data going back to 2019, but decided only to load historical monthly financials from 1/1/2021 through the NetSuite implementation go-live date.
Before you choose: watch out for how NetSuite handles retained earnings
NetSuite differs from older legacy systems in that it automatically “rolls forward” the prior fiscal-year net income into a system-generated retained earnings account. That means you don’t need a manual year-end close entry.
But it also means that when loading historical data, you must carefully consider the behavior of retained earnings.
This concept is critical when reversing journal entries across a fiscal year-end. NetSuite’s journal entry reversal functionality posts the reversal amounts to the original account, regardless of whether it's a fiscal year-end. This occurs when loading historical financial statements. The legacy system report will reflect the adjusted retained earnings balance. This issue is applicable to approach #2 below.
Let's move on to the two approaches:
Approach 1 - the Net Change Entry Approach
What it is:
-
First, load a journal entry for the opening balance sheet as of the day before your first legacy month you want in NetSuite (e.g., 12/31/2020 for a 1/1/2021 start). That entry consolidates all past activity (e.g., 2019–2020) from our example above.
-
Then, for each month, create a journal entry reflecting the net change in each account (using a SUMIFS or equivalent) based on your legacy system’s transaction list. Include any segment dimension values (GL account, Department, Class, Location) by mapping from legacy to NetSuite segments.
See the graphic below as an example:

Why it works — and where it stutters:
-
✅ Pros:
-
You only post one journal entry per month (simpler ongoing maintenance).
-
Because you imported the net change rather than a full trial balance each month, you avoid the manual work of reversing the P&L activity from retained earnings across fiscal-year ends.
-
Segment mapping (department, class, location) from legacy to NetSuite is viable because you’re working off transaction-level data.
-
-
⚠️ Cons:
-
If your legacy system (e.g., QuickBooks Online) has a high transaction volume, exporting a complete transaction list may exceed report limits (e.g., QuickBooks Online caps exports at around 30,000 lines). This can force manual consolidation of multiple exports.
-
Requires intermediate Excel proficiency (especially using SUMIFS or pivot logic) and careful reconciliation.
-
Best when: Your legacy system exports full transaction detail (with segments) easily, you want to preserve segment-level integrity (department, class, etc.), or you want minimal manual intervention around retained earnings.
Approach 2 - Point-in-Time Approach
What it is:
-
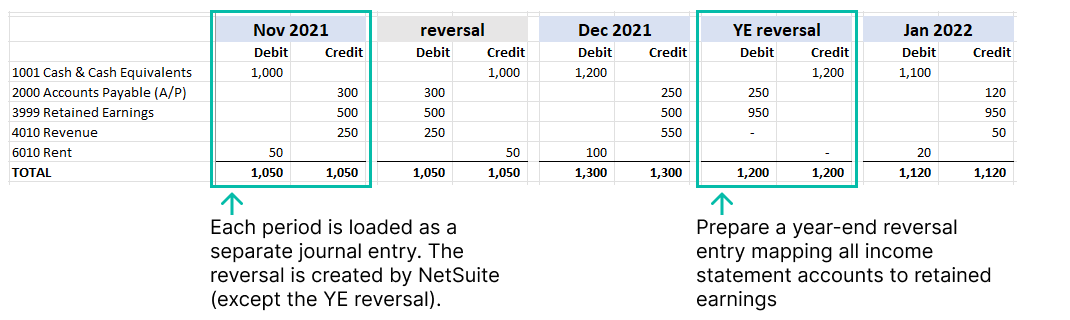
Run a monthly trial balance report from your legacy system for each month you want to migrate. For each month, prepare a journal entry in NetSuite for that balance as of month-end.
-
For each monthly entry, set a reversal date so NetSuite automatically reverses it at the start of the following month, except for your go-live starting balance.
-
If your historical span crosses a fiscal year-end, you need to manually adjust for retained earnings by reversing P&L into retained earnings (since NetSuite doesn’t replicate legacy close logic).
See the graphic below as an example:
Why and when it works — and where it’s tricky:
-
✅ Pros:
-
⚠️ Cons:
-
Many legacy systems (QuickBooks Online, QuickBooks Desktop, Xero) do not support exporting a trial balance with segment details (department, class, location). That limits the ability to preserve segment granularity on the import.
-
Must carefully reverse entries crossing fiscal-year ends; otherwise, your retained earnings or P&L history in NetSuite will be misaligned.
-
Best when: Your legacy system can deliver monthly trial balance reports with full segment info, or when preserving segment detail is less important than getting accurate month-end balances. This approach works really well with Oracle Fusion, SAP, and Great Plains.
Other Considerations (Regardless of the Approach)
General Tips:
These are general tips that should be followed, regardless of the approach and the legacy system.
-
Always include a fictitious AP Vendor and an AR Customer on all lines that impact any account configured as an “Account Payable” (AP) or “Account Receivable” (AR) account type. Otherwise, you will have a “No Vendor/Customer” line on the detailed subledger reports that cannot be removed.
-
Each subsidiary needs a separate journal entry.
-
Consider a two-batch loading strategy: a “dry-run” before go-live to validate your entries, followed by the actual load at go-live to reduce downtime risk and give stakeholders confidence.
-
Bank balances in a different currency from the subsidiary's reporting currency will need to follow a two-step approach:
-
First, duplicate the bank account in the reporting currency. I usually add " (import only - GBP)" to the account name, add a ".1" to the account number, and make the account a child of the post-go-live GL account.
-
Next, map all the journal entry activity to the GL account created above.
-
Then, at go-live, use a Bank Transfer transaction to move the balance from the import-only account to the live account. Validate that the import-only account is zero.
-
Finally, deactivate the import-only account after the balance is zero.
-
The 13th period
A recent client migrating from Oracle Fusion was using a "13th period" for post-close adjustments. We were using the point-in-time approach for loading historical financial statements. Here is how we handled this:
-
Create the appropriate 13th periods for each fiscal year.
-
For the 12th period (i.e, Dec), manually create the reversing journal entry. When creating the reversing entry, set the posting period to be the 13th period.
-
For the 13th period (i.e, Dec), also manually create the reversing journal entry. When entering this reversing entry, set the posting period to be the 1st period of the next fiscal year.
Intercompany Balances
These are tips when working with multiple subsidiaries:
-
When a client has intercompany AR and AP accounts:
-
Create "import only" intercompany AR and AP account types. Map all the historical activity to these GL accounts.
-
As of the go-live date, use an advanced intercompany journal entry to transfer the balances out of the "import only" accounts and into the live accounts, with the appropriate intercompany settings checked on the journal entry line.
-
-
If you have multiple subsidiaries with different reporting currencies:
-
Import the consolidated exchange rates that the client used for their historical reporting
-
Load the journal entries in the reporting currency of the subsidiary.
-
Consider historical equity balances.
-
Intercompany balances, especially when multiple reporting currencies are involved, are complex.
Conclusion
If your legacy system is QuickBooks Online, QuickBooks Desktop, or Xero, I recommend using the net change approach. I recommend the point-in-time approach if your legacy system is Great Plains (or any other system that uses a single string to represent all segment values).
You might be interested in my other blog posts on loading open financials, open AR, and open AP transactions.
Please get in touch with me if you are overwhelmed by the data migration requirements or would like to discuss loading your full transactional history. OptimalData Consulting has helped over 100+ clients migrate their data into NetSuite.
.png?width=352&name=NetSuite%20CSV%20Import%20Tool%20(1).png)