NetSuite, Implementation, Data Migration
July 8, 2026
7 min Read
Importing open purchase orders from QuickBooks into NetSuite is a standard go-live task. It ensures you can continue receiving against existing orders after your NetSuite implementation is complete.
In short: export your open PO details from QuickBooks, import only the unreceived balance of each order into NetSuite by CSV, preserve the legacy PO numbers, then validate by PO and item.
This article walks through that process step by step. It is one piece of a larger QuickBooks-to-NetSuite data migration plan, and open sales orders follow a similar pattern.
TL;DR
- Import only the unreceived balance of a partially received PO, not the original amount.
- Enable Allow Override so NetSuite keeps your original legacy PO numbers.
- Use items rather than GL accounts on PO lines so multiple vendor bills can apply.
- Blanket POs can't be CSV-imported: plan for UI entry, SuiteScript, or integrator.io.
How do you handle partially received purchase orders?
It is common to have partially received purchase orders at go-live. This is especially true in industries like biotech, where purchase orders for clinical services can remain open for months or even years.
For partially received purchase orders, you should import only the remaining (unreceived) balance into NetSuite.
Example: If purchase order #1200 for ProPharma Group was originally $3,000,000 and you have already received $1,000,000 in services, you would import the purchase order into NetSuite with a remaining value of $2,000,000.
What should you close before exporting POs from QuickBooks?
Before exporting purchase orders from QuickBooks, clean up your open purchase order list. Close any orders that should no longer remain open. Common cleanup strategies include:
- Closing orders below a certain dollar threshold
- Closing orders dated before a specific cutoff date
- Working with operations to identify orders that are no longer expected to be received
Ideally, export the final open purchase order list after the legacy system is closed to prevent balance changes while you complete the import. However, you can export earlier versions to review and identify lines to close. In QuickBooks, you can also close specific lines on a purchase order.
How do you export open purchase orders from QuickBooks Desktop?
To export your open purchase orders from QuickBooks Desktop:
- Open QuickBooks Desktop and go to the Reports menu.
- Select Purchases & Expenses, then choose Open Purchase Orders Detail.
- Click Customize Report. On the Display tab, add Item, Item Description, and any other fields you need for your NetSuite import.
- Export the report as an Excel or CSV file.
After exporting to Excel, sort the file by the Num field.
How do you export open purchase orders from QuickBooks Online?
To export your open purchase orders from QuickBooks Online:
- Open QuickBooks Online and navigate to Reports.
- Find the Open Purchase Orders Detail report.
- Under the Date dropdown, select All Dates.
- Add any needed fields under the Settings (gear) icon.
- Export the report as an Excel file.
After exporting to Excel, sort the file by the Num field.
Note: QuickBooks Online allows purchase order lines coded directly to a Category (GL account) without an item. NetSuite also supports purchase orders using both GL accounts and items, but GL account lines have limitations. See "Using items vs. GL accounts on purchase orders" below for details.
How do you import purchase orders into NetSuite?
Once you have cleaned and exported your purchase order list from QuickBooks, you can import it into NetSuite.
1. Prepare the CSV import templates
Export the purchase order details from QuickBooks, then add the fields NetSuite requires. At a minimum, you will typically need the NetSuite vendor and item on each line. Review any additional required fields and add them to your spreadsheet.
I recommend mapping vendors and items using the Internal ID rather than the Name field. If you have not yet loaded your vendors, see best practices for importing vendors to NetSuite first.
After you finish preparing the file, save a working copy with formulas as an .xlsx. Then create a separate tab (or separate file) for the final CSV upload output.
2. Turn off auto-numbering for legacy purchase orders
You will usually want to preserve the original QuickBooks purchase order number since it has already been communicated to your vendors.
By default, NetSuite auto-numbers purchase orders. To allow legacy numbers, go to Set Up Auto-Generated Numbers, open the Document Numbers subtab, and check Allow Override for the purchase order transaction type.
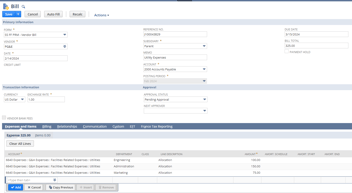
3. Import a test purchase order into NetSuite
Import a single purchase order first. Confirm it imports correctly and validate that all fields map as expected before loading the full list.
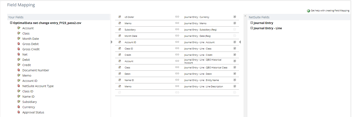
Here is an example purchase order import template:
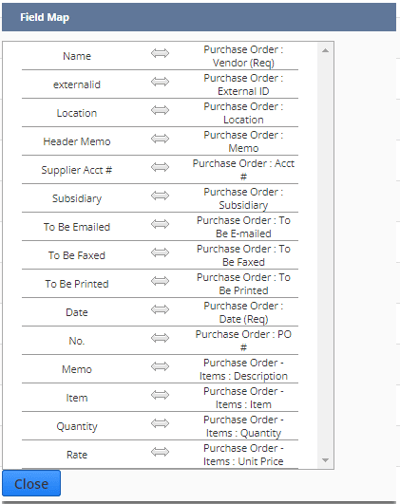
A few considerations when preparing the import template:
- Set To Be Emailed, To Be Faxed, and To Be Printed to False. Vendors already have these orders, and you do not want to resend them.
- If you mapped values using internal IDs, set the mapping type to Internal ID in the import settings.
- Validate the purchase order number and amounts. It is easy to accidentally include taxes or forget to enable override numbering.
4. Import the complete list of purchase orders
After validating your test purchase order, import the remaining purchase orders. Depending on volume, the import may take anywhere from a few minutes to several hours.
If you hit errors during the load, 19 solutions to common CSV upload errors in NetSuite cover the most frequent ones.
5. Validate the imported purchase orders between QuickBooks and NetSuite
After the import completes, verify that purchase order lines were imported correctly. Create a saved search for the purchase orders you created in NetSuite, and compare the results with the QuickBooks export from step 1.
To create the saved search:
- Navigate to Reports > New Search and select Transaction.
- Set criteria:
- Main Line = False
- Type = Purchase Order
- Set results columns to include (at minimum):
- PO number
- Item
- Amount
- Any additional fields you want to validate
For most clients, I validate the amount by PO number and item.
Other considerations
Purchase orders for service contracts
NetSuite purchase orders are optimized for receiving physical goods, not managing long-running service contracts. This can create issues when service vendors bill intermittently or on inconsistent schedules.
A common workaround is to set the Rate to $1 and the Quantity to the total contract value on the purchase order line. This allows multiple vendor bills to be applied over time.
If you instead leave quantity at 1, NetSuite may close the PO line after the first vendor bill, even if additional invoices are expected.
Using items vs. GL accounts on purchase orders
NetSuite allows both items and GL accounts on purchase orders, but they behave differently.
Purchase order lines created with GL accounts typically do not support multiple bills against the same line. Once a vendor bill is applied, the line is effectively consumed. This limitation often makes GL accounts impractical for service-based purchasing.
For that reason, I generally recommend using items instead of GL accounts, even for services. Item-based purchase orders provide better control over billing, support partial invoicing, and reduce downstream cleanup when reconciling open purchase orders.
If you expect multiple bills against a purchase order line, use items and structure the quantity to support incremental billing.
Blanket purchase orders in NetSuite
A blanket purchase order is used when you commit to purchase a defined quantity or dollar amount from a vendor over time, with individual releases created as needed to draw down against that total. One key limitation to be aware of during an implementation is that blanket purchase orders cannot be created via standard CSV import. As a result, if you need to bring these into NetSuite, you have three practical options:
- Manually create them in the UI
- Use a custom script (such as SuiteScript) to generate the records
- Leverage an integration tool like integrator.io to handle the creation
The right approach typically depends on volume and complexity, but this is one area where the migration strategy should account for NetSuite's constraints up front rather than relying on standard import methods.
Frequently asked questions
Do I import the full PO amount or only the unreceived balance?
Import only the unreceived balance. For a partially received purchase order, bring in the remaining value, not the original amount. If a $3,000,000 PO has already received $1,000,000 in goods or services, import it as a $2,000,000 order.
Can I keep my original QuickBooks PO numbers in NetSuite?
Yes. NetSuite auto-numbers purchase orders by default, but you can preserve legacy numbers by checking Allow Override on the Document Numbers subtab of Set Up Auto-Generated Numbers. This keeps the PO numbers you have already communicated to your vendors intact.
Can blanket purchase orders be imported via CSV?
No. Blanket purchase orders cannot be created through standard CSV import. Your options are manual entry in the UI, a custom SuiteScript, or an integration tool like integrator.io. Decide the approach up front based on volume and complexity.
Should I use items or GL accounts on purchase orders?
Use items. GL-account PO lines typically do not support multiple bills against the same line, so the line is consumed after the first vendor bill. Items support partial and incremental billing, which matters most for service contracts.
Conclusion
Importing open purchase orders from QuickBooks into NetSuite is straightforward when you follow a disciplined process: clean up the open list, export the right report, import a test record, and validate the final results in NetSuite.
If you found this article helpful, here are a few ways I can help you:
- Contact me for a free consultation.
- View my free article on loading historical financial statements and open transactions.
- Watch my free YouTube playlist: QuickBooks Online to NetSuite data migration.

.png?width=352&name=NetSuite%20CSV%20Import%20Tool%20(1).png)