Implementation, Data Migration, CSV Uploads
February 12, 2024
8 min Read
Introduction
Using the CSV import tool to import records into NetSuite can greatly benefit your team. It allows for efficient and accurate data entry, saving time and reducing the risk of errors.
In this article, we will guide you through the permissions required to access the CSV import tool, how to navigate to the tool, understand the basics of each CSV import page, provide use cases for learning how to import CSV records and share some additional articles for loading specific transactions into NetSuite.
Note that all screenshots in this article are from the “Administrator” role. Your role might have a different layout.
Permissions required to access the CSV import tool
To access the CSV import tool in NetSuite, a user’s role must include:
-
Import CSV File
-
Set Up CSV Preferences
Check with your system administrator if you don’t see the CSV import option available.
If you are concerned that your role doesn’t have the proper permissions, I recommend requesting Administrator access to your sandbox account. Navigate to the specific page in the sandbox and copy the URL into your production instance (with the correct company number in the URL staying intact). NetSuite will tell you the permissions you lack to complete the appropriate task. See the screenshot below as an example:

Navigate to the CSV Import Pages
To navigate to the CSV import page as an administrator, go to Setup -> Import/Export.
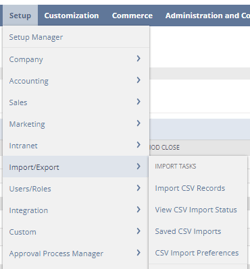
Understanding the CSV Import Task Pages
There are four pages under the “Import Tasks” section. Here is an overview of each page:
-
Import CSV Records: where you begin a new import.
-
View CSV Import Status: shows the status of any ongoing CSV imports.
-
Saved CSV Imports: you can access a previous import you saved as a template.
-
CSV Import Preferences: you can change advanced settings related to CSV imports. Most users shouldn’t need to modify these settings.
Below, I go into more detail about the Import CSV Records and Saved CSV Imports pages.
The Import CSV Records Page
There are five steps to importing CSV records in NetSuite:
-
Scan and Upload File
-
Import Options
-
File Mapping
-
Field Mapping
-
Save Mapping & Start Import
Below is an overview of each step:
Step 1: Scan and Upload File
The Import CSV Records page is where you start a brand new CSV import. Here are the key fields to understand:
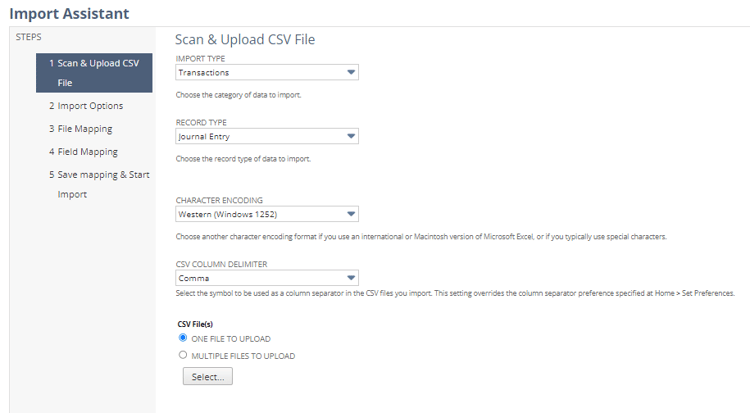
The Import Type and Record Type dropdowns
The import type is a general category, and the record type is the specific record you want to import. The nomenclature typically follows the navigation bar within NetSuite. For example, customers, vendors, and contacts fall under the “Relationships” import type. Journal entries, vendor bills, and invoices fall under the “Transactions” import type.
Not all record types can be imported. For example, deposit transactions cannot be imported via the native CSV tool. I always recommend making sure the record type you want to modify is available before starting any work on an import template.
Character Encoding
The default value (Western (Windows 1252)) should work for most users. If you get an error message regarding special characters in your upload file, consider changing the character encoding dropdown to the “Western (ISO-8859-1)” option. Otherwise, you might need to run a CLEAN formula in the CSV file before importing.
CSV Files - One vs. Multiple Files
When importing records that support embedded lists, NetSuite offers the option to import these as a single file or multiple files. Let's use a journal entry transaction as an example. A journal entry has specific fields set at the header, or main line, level - like the date, the period, and the subsidiary. However, a journal entry has multiple line-level fields, like the GL account, department, debit, or credit amount.
If you import a journal entry as a single file, every line-level row in your spreadsheet must share the same value on the header level.
However, importing a journal entry as multiple files would have one file with all the header-level fields and a second with the line-level fields. A shared key must link the two files, typically the external ID or the document number.
I’ve imported records using both methods. I believe the decision should be based on how your data is formatted.
Step 2: Import Options
Users set the import type on the import options page and can set advanced options. As a new user, the primary consideration on this page is whether your import adds new records or modifies existing records.
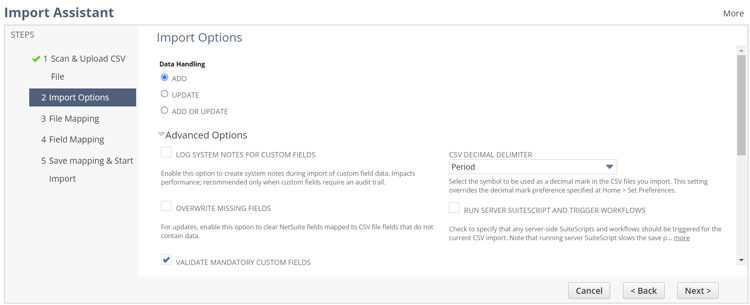 Adding new records creates a new record. All required fields must be populated within the template when creating a new record.
Modifying a record will adjust an existing record in NetSuite. At a minimum, you’ll need the internal or external ID populated and the field you want to update. You’ll also want the line ID if you update line-level data. When I need to modify existing records, I create a saved search with the internal ID and line ID included in the search results. Once you have the population of transactions you want to modify, export it to an Excel or CSV file, make changes to the file in Excel, and upload it into NetSuite with the CSV import tool. That will ensure you have the correct internal and line ID.
The only field I’ll discuss under the advanced options is the “Run Server SuiteScript and Trigger Workflows” box. If this is checked, any scripts or workflows associated with the transaction type are set on page one. For example, if you are importing a journal entry and have an approval workflow set, checking this box will trigger the approvals.
Step 3: File Mapping
This page only applies if you use multiple CSV files in your import. In this step, you set the key that links the two files together. For example, with a journal entry import, you would use the Document Number or External ID field as the link.
Step 4: Field Mapping
This step requires the user to link the CSV columns to the appropriate field in NetSuite. Each record type has unique fields. Below are OptimalData articles discussing each record type:
-
Journal entries (link coming soon)
-
Vendor bills (link coming soon)
-
Invoices (link coming soon)
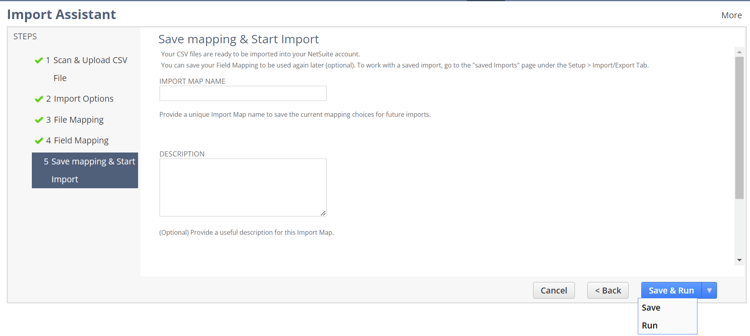
Step 5: Saving Mapping & Start Import
This final task allows users to save the template, run the import, or save & run the template. If you plan to use the import template multiple times, I’d recommend saving the template. Otherwise, you can click the “Run” option. You can select the upload option by clicking the arrow on the blue button in the bottom right corner of the page.
The View CSV Import Status Page
The view CSV import page shows the status of ongoing and historical imports and the ability to download failed CSV imports. I recommend sorting the list by the date from newest to oldest.
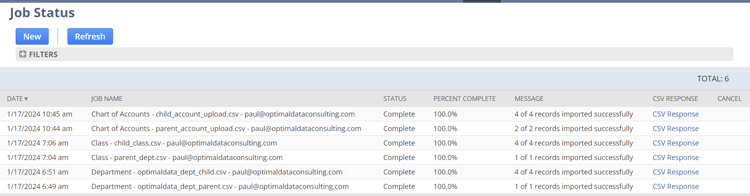 To download the failed CSV imports, click the “CSV Response” link on the right side of the list. The CSV file will open and provide a brief error message. See my article on solutions to 19 common CSV errors for additional assistance on common CSV errors.
The Saved CSV Records Page
The saved CSV records page allows users to save templates to be used repeatedly. For example, when I import transactions from QuickBooks during a NetSuite implementation, I load data in multiple batches. I save a vendor bill template and reuse the template to save myself time.
I almost always save my import template because setting up the field mapping template can be time-consuming. I also like to load a single record first to validate that the template works correctly.
It can be helpful for larger organizations to have a shared template nomenclature to ensure that the template list does not get too large. I’m unaware of a systematic way to rename or remove CSV templates.
Use-Cases for NetSuite CSV Imports
The OptimalData team lives on the CSV import page. Here are a few use cases for learning how to import CSV records:
-
Importing the payroll journal entry from your payroll provider. This entry is loaded several times a month and often involves segregation at the account and department level.
-
Adding email addresses on customer records.
-
Inactivating vendor records that are no longer needed.
-
Importing historical financial statements and open transactions from an acquired company.
-
Reclassifying transactions from an old department to a new department.
Additional Articles relevant to NetSuite implementations
OptimalData has additional articles on importing records specific to a NetSuite implementation, including:
-
Importing historical financial statements and open transactions.
-
Importing open accounts receivable, open accounts payable, and open bank transactions.
-
Importing open sales (link coming soon) and open purchase orders (link coming soon).
CloudExtend Excel for NetSuite
If you want an alternative to the CSV import tool, I’d highly recommend checking out the CloudExtend Excel tool by Celigo. I’ve played around with this tool, which is handy for importing records into NetSuite. Here is the link for further information.
Conclusion
In conclusion, NetSuite's CSV import tool is a powerful feature that allows efficient and accurate data entry into the system. Following the steps outlined in this article, you can easily navigate the tool, understand the different import pages, and import various types of records. Whether you are importing customer data, vendor bills, or journal entries, the CSV import tool will save you time and reduce the risk of errors. Remember to ensure your role has the necessary permissions and consult with your system administrator. Start using the CSV import tool today and streamline your data import process in NetSuite.
If you found this article helpful, here are some additional ways that OptimalData can help you:
-
Hire OptimalData Consulting to migrate your data into NetSuite. Contact me today for a free quote.
-
Purchase my transactional CSV guide for $50, available on my website.
-
Sign up for my QuickBooks Online to NetSuite data migration course.