NetSuite, Reporting, Intercompany
January 10, 2024
5 min Read
Introduction
NetSuite is a phenomenal tool for managing intercompany transactions and producing consolidated financial statements. However, configuring the system to manage legacy balances or data in another system can be challenging. This article discusses how to load standalone subsidiary financials and use the advanced intercompany journal entry feature to create elimination entries, allowing users to manage consolidated financial statements directly in NetSuite.
This article is geared towards companies implementing NetSuite. But other applicable use cases exist. A common one is if you have a foreign subsidiary that manages its financial statements and provides the US-based entity with a trial balance at the end of the period. This article is highly relevant if the US team loads this trial balance into NetSuite to produce consolidated financials. I’ve helped two clients in this exact scenario.
Advanced intercompany journal entry basics
Before we start, let's review a few advanced intercompany journal entry basics:
-
Advanced intercompany journal entries require at least two subsidiaries and four lines. Each subsidiary must have a debit and credit amount.
-
The “Eliminate” checkbox allows users to indicate whether the journal entry line should be eliminated.
-
The general ledger (GL) account must be configured to eliminate intercompany entries if you want to check the Eliminate checkbox. This step is completed on the general ledger account record.
-
You can post both intercompany transactions and non-intercompany transactions to most intercompany accounts. However, intercompany Accounts Receivable (AR) and Accounts Payable (AP) accounts must be set to eliminate.
How to Load Historical Consolidated Financial Statements
1. Review your current consolidated financial statements
First, you will need to understand how your current financial statements consolidate. Most clients who are moving from QuickBooks manage this process in Excel. At a minimum, you’ll want to identify the following:
-
The individual GL accounts that should eliminate
-
The counter-subsidiary GL account and balance
-
Confirm that all of these accounts nets to zero
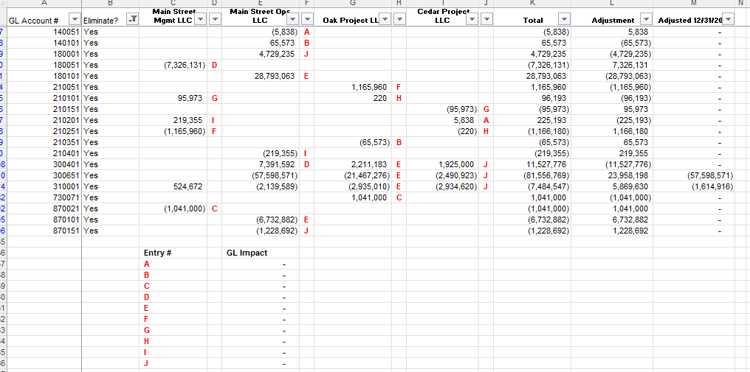
Every company manages this differently. Below is an example file of what this might look like for you. This file will be used for step 4 below.
2. Adjust the GL account mapping based on elimination requirements
All account types will allow you to post eliminating and non-eliminating transactions to the account except intercompany AR and AP accounts. These accounts must be mapped to an other current asset or liability account. Otherwise, the journal entries prepared in step # 3 below will fail. We will reclassify these balances in step # 4 to the appropriate intercompany AR or AP balance.
Check out my article on segment maps for additional tips and tricks on this step.
3. Load each subsidiary’s financial statements with a journal entry
Now, you must prepare and load each subsidiary's financials as a journal entry. I’ve written multiple articles on how to complete this. Below are the links:
4. Prepare the advanced intercompany entries
Next, you’ll prepare the advanced intercompany entries to reclassify account balances that need to eliminate. In step 3, we loaded the balance by each subsidiary with an individual journal entry, which NetSuite won’t flag to eliminate. We need to reclassify these balances with an advanced intercompany entry so that NetSuite can eliminate the balance.
The trick here is to post to the same GL account but only set one line on the intercompany entry to eliminate. The graphic below displays the mechanics of how this works, and the screenshot shows an example entry:
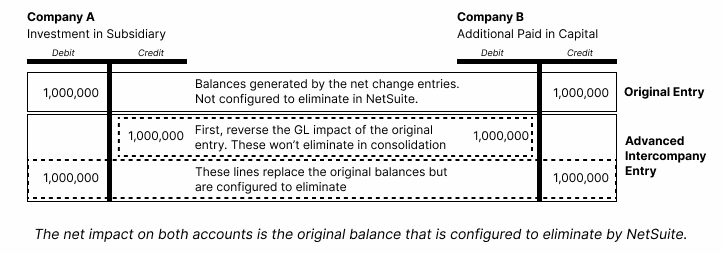
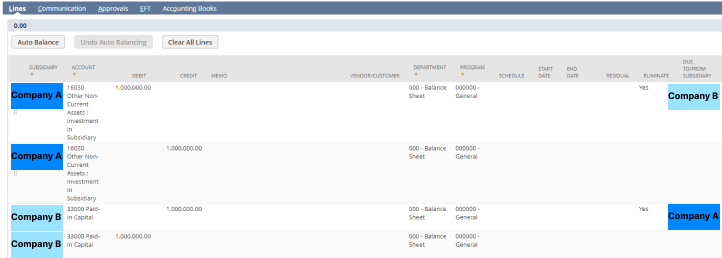 The idea is to reverse the balance of the non-eliminating lines and replace this balance with an eliminating line. The key is to understand how the balances match between the subsidiaries.
Here is the opportunity to reclassify intercompany AR and AP balances. For instance, if you had a $5,000 intercompany AR balance originally posted to another current asset, you would debit the intercompany AR balance instead of the other current asset account.
5. Run the Eliminate Intercompany Transactions process and validate the results
We are ready to run the Eliminate Intercompany Transaction process. You can find this task under Setup → Accounting → Manage Accounting Periods. You’ll need to close the prior periods before running the task. A quick trick is to run the Close Multiple Periods processes through the selected period, reopen the appropriate period, and then select Eliminate Intercompany Transactions.
Once complete, I’d recommend validating the results by reviewing a consolidated balance sheet and income statement by the subsidiary. You’ll need to ensure that all intercompany balances are zero in consolidation and that the Cumulative Translation Adjustment-Elimination account balance is zero on the balance sheet. If the CTA-Elimination balance is not zero, the elimination lines do not balance across your intercompany entries.
6. Repeat the process for all the periods you need consolidated financials
Finally, you need to repeat this process for the periods requiring consolidated financials. There are two approaches to completing this step:
-
Reverse each advanced intercompany journal entry and post the as-of-date balances. This approach works well if the consolidated balances are complex. Don’t forget that you’ll need to reverse P&L accounts to retained earnings at year-end manually. If you take this approach, you only need to run the Eliminate Intercompany Transaction process in step # 5 in the periods directly impacted by the original and reversing entries.
-
Post the advanced intercompany entries with changes in balance amounts. This approach could result in fewer entries but will require you to run the Eliminate Intercompany Transaction process in all periods.
Closing
In conclusion, loading historical intercompany entries in NetSuite can be complex but accomplished with careful planning and attention to detail. Following the steps outlined in this article, you can ensure that your consolidated financial statements are accurately reflected in NetSuite. If you have questions or need assistance with NetSuite implementation, please contact me or visit my implementation resource page for additional tips & tricks.