NetSuite, Implementation, Data Migration, Planning
January 10, 2024
5 min Read
Introduction
Importing entity addresses is one of the first and most important steps during a NetSuite implementation. Typically, your NetSuite implementation partner will need vendor and customer upload templates at the very beginning of the project.
This article discusses how to export address information from QuickBooks Online, two approaches to importing addresses into NetSuite, and tips and tricks for cleaning address information.
Understanding address fields in QuickBooks Online
QuickBooks Online allows users to have two customer addresses and a single address for vendors. Customers can have a ship to address and a bill to address. QuickBooks will include both addresses on a single line on the customer contact report. This functionality differs from NetSuite and is essential to understand when preparing the CSV template.
For all addresses in QuickBooks, the individual address components are:
-
Street
-
City
-
State
-
Zip
-
Country
Please note that as of the writing of this article (January 2024), QuickBooks was updating its reporting functionality. All of the report tips below reference the “Classic” reporting.
Exporting customer addresses from QuickBooks Online
To export the customer address information, navigate to the Reports page and find the “Customer Contact List.” The read-only permission level in QuickBooks Online does not include access to this report.
The default version of the customer contact list will include the full Billing and Shipping Address. The address components for each customer will start with either “Billing” or “Shipping” respectively. If you plan to import the individual components, you must manually add them to the report.
Exporting vendor addresses from QuickBooks Online
To export vendor address information in QuickBooks Online, navigate to the Reports page and find the “Vendor Contact List.” Note that the read-only permission level in QuickBooks Online does not include access to this report.
The default version of the report does not include each address component. The full address is on a field called “Address.” You will need to add each address component to the report.
Importing addresses into NetSuite
There are two approaches to loading addresses into NetSuite. You can either (1) import the customer/vendor information and the address in a single upload or (2) import the customer/vendor information first and load addresses as an updated CSV load, linking to the customer/vendor with the external or internal ID. I’ll discuss each option below and the pros and cons of each.
Import a single file with entity and address information
This approach works well with QuickBooks to NetSuite migrations because QuickBooks includes all address information on a single line. Under this method, you would map the Billing Address fields under “Customer - Address 1” and the Shipping Address fields under “Customer - Address 2.” Set Address 1 as the “Default Billing” address and Address 2 as the “Default Shipping” address.

The primary benefit of this approach is that it is relatively easy to complete. There is minimal file manipulation needed.
The primary downside of this approach is that every entity will have an address created, even if the entity doesn’t have an actual address. NetSuite will think that you want an address to be populated. The easiest way to get around this would be to create separate files, one that has entity addresses populated and one for entities without addresses.
Import entity information first and update address information
Under this method, users would create the customer or address record first. Then, users would add the entity’s address with an “Update” CSV import. You would link the address to the entity using the internal or external ID.
The primary benefit of this approach is that your address list will be cleaner. You don’t have to create duplicate addresses or addresses with just the required country field. The primary downside of this approach is that it's more work.
I use this approach when I import entity addresses for my clients. But keep in mind that I have a Python script cleaning and formatting the files as NetSuite requires.
Using NetSuite’s address override functionality
NetSuite does have an address override functionality. This means you can import a single text string and set that string as the entity address instead of importing each address component. The primary use case for this functionality is when you can’t efficiently cleanly extract the address components.
Here is an example:
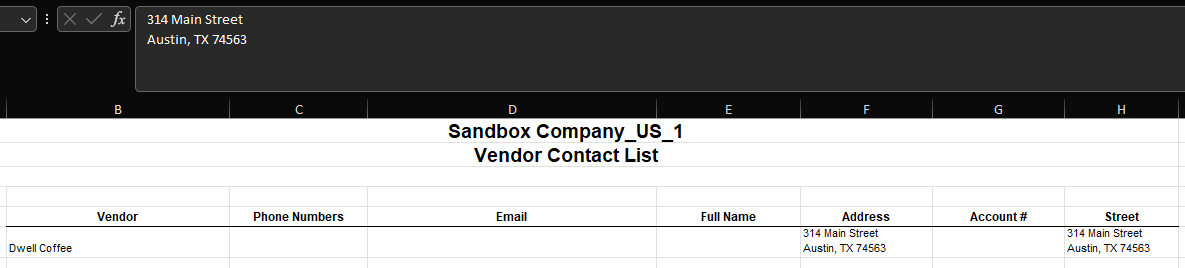
I had a client with many vendor addresses populated only in the “Street” field. The issue is that QuickBooks Online allows you to populate an Address 1 and Address 2 fields, but the standard report won’t let you access the individual Address 2 field. QuickBooks includes both Address 1 and Address 2 in a single Address 1 field with the line break within the Excel file! See the screenshots below to see what I’m talking about. (I guess this issue will disappear when QuickBooks finishes rolling out their new enhanced reporting functionality.)
In this instance, rather than manually splitting out each address component, you can set NetSuite to read the single field and make that the entity address.

To take advantage of this functionality, set the field with the full address string to the Address field and set the “Override” to True. You’ll still need to set the Country field.
Tips & Tricks for Cleaning Address Fields
Here are some tips and tricks for cleaning customer and vendor address fields before importing them into NetSuite:
-
For customers, rather than importing the same address twice, once as the shipping and once as the billing address, you import a single address and set this single address as the “Default Billing” and “Default Shipping” address. If you plan to implement this, you’ll need to import the entity information first and the address information second.
-
The country is a required field in NetSuite and must be valid. The list of valid NetSuite countries can be found by searching “Countries” in the global search bar. Users can use a VLOOKUP or XLOOKUP to map the legacy country to a valid NetSuite country.
-
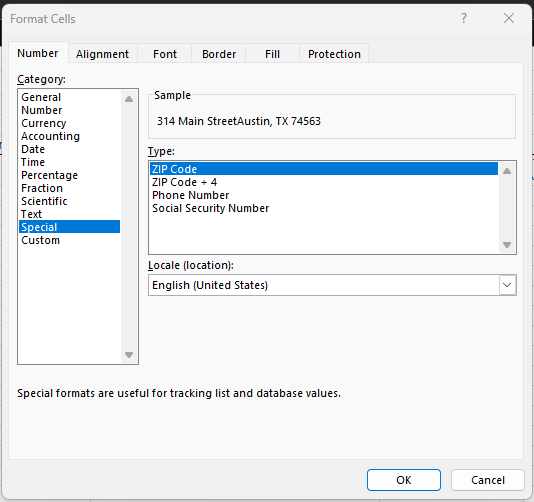
Zip codes can get truncated within a CSV file. To avoid this issue, format the Zip code as “Special” and select “ZIP Code.”
Conclusion
Loading entity address information is crucial to a successful NetSuite implementation. Learning how to export this data from QuickBooks Online is an essential first step, but users must also understand how to import these records into NetSuite.
If you found this article helpful, here are other ways I can help you:
-
Hire OptimalData Consulting to migrate your entity records and historical financial data into NetSuite. Contact me today for a free quote.
-
Purchase my saved search course for accountants or my transactional CSV guide for $50, both available on my website.
-
Sign up for my upcoming QuickBooks Online to NetSuite data migration course.