
Data Migration, QuickBooks, Master Records
January 15, 2024
5 min Read
Introduction
A vendor is an entity with whom you purchase goods and services. Vendor records track contact information, past transactions, and communications with them. Vendors are one of the first master record types you will need to migrate from QuickBooks Online (QBO) as part of a NetSuite implementation.
In this post, I will discuss:
-
How to export the vendor contact list from QBO
-
When will I need to import vendor records into NetSuite during an implementation
-
Six key vendor record differences between QBO and NetSuite
-
How OptimalData can assist with completing this task
Run the vendor contact list from QuickBooks Online
The below steps discuss how to set up the vendor contact list from QBO:
-
Navigate to the Reports page.
-
Scroll to the "Expenses and Vendors" section and click the Vendor Contact List option.
-
Click the Options wheel and select the appropriate fields.
-
Exclude the ‘Address’ field. Instead, select each address component (i.e., Street, City, State, Zip, Country).
-
Save the report. You will need to import vendors multiple times during the NetSuite implementation.
When will I import vendor records in a NetSuite implementation
During a NetSuite implementation, most teams will import vendor records twice - at the beginning and end of the implementation.
At the beginning of the implementation, you'll most likely import all the current active vendors at that point. Typically, partners want these imported so users can see the differences and perform testing and UAT processes with real vendor data.
While the implementation is ongoing, the company is adding vendors to the legacy system. Hence the need for a second import right before the go-live date. At this point, the company can either (1) delete all the existing vendors and reload them into NetSuite or (2) add new vendors that were created after the beginning import was completed.
Six vendor record differences between QuickBooks Online and NetSuite
You must clean the vendor data after exporting the vendor list from QBO. The below six tips & tricks will assist you with preparing the NetSuite CSV import template for vendors.
Individual vs. Company
NetSuite has a required field called "Is Individual." This designates whether the vendor is an individual or a company. This is a classification designation and only impacts how the vendor is displayed. There is no functional difference between the two designations.
Individuals require a first and last name, and companies need a company name in NetSuite. QBO only requires a display name, which can be populated based on the company name or first and last name.
I recommend leveraging the tax identifier if you plan to use this field in NetSuite. In the United States, a social security number has two dashes (i.e., xxx-xx-xxxx), while a business tax ID has one dash, xx-xxxxxxx. Use an Excel formula to count the number of dashes. This information, combined with a first and last name, can quickly identify if someone should be an individual or a business.
Otherwise, I would set the Is Individual field to False for all entity records.
Countries
In NetSuite, the country address field must match a value on NetSuite’s country list. In QBO, the country address field is not required and is a free-form text field.
Users must include a valid NetSuite country to import a valid address in NetSuite. Users can find the complete NetSuite country list by searching “Set Up Countries” in the global search bar. You can copy & paste this list into Excel and use a formula to pull in a valid address.
Check out my article on importing entity addresses for additional assistance with importing entity addresses.
Contacts
In QBO, the vendor and its primary contact are saved in a single record. NetSuite allows users to associate multiple contacts with a single vendor. To save several emails or phone numbers to a single vendor, you must create a contact and associate the contact with the vendor.
Emails
QuickBooks will allow you to enter multiple email addresses on a single vendor record separated by a comma. NetSuite only allows a single email address in the email field.
To add multiple email addresses, you must create a contact record with each email address, associate the contact with the vendor, or create a custom field to add the email address.
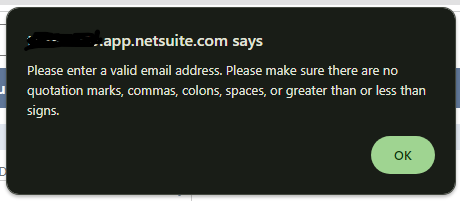
NetSuite won't allow special characters, such as quotation marks, commas, colons, spaces, or greater than or less than signs. You must use an Excel formula or filter to search and clean email addresses that contain these characters before
Currencies
In QBO, an individual vendor can only have a single currency. If you need to pay a vendor in multiple currencies, QuickBooks will create a separate vendor record and delineate the records by adding a " (EUR)" or " (USD)" to the end of the name.
NetSuite allows you to associate multiple currencies with a single vendor. If you create vendors via CSV upload, you can use the currency’s name or internal ID and separate multiple currencies with the assigned delimiter. The default delimiter is the pipe (|) symbol. Here is what this might look like for a vendor who transacts in US Dollars and Euros: "US Dollars|Euro."
Be sure only to import a single instance of the QBO vendor. For example, you don’t want to import the USD and EUR vendors from QuickBooks.
Subsidiaries
QuickBooks does not have a subsidiary functionality. Hopefully, if you manage multiple subsidiaries in QuickBooks, you have multiple instances instead of managing all these records in a single file.
NetSuite will allow users to associate a single vendor with multiple subsidiaries, similar to currencies. You can import the vendors with the same default delimiter noted above.
How OptimalData can automate cleaning vendor records
OptimalData has built a tool to export, clean, and format vendor records into NetSuite. A few benefits of our service include:
-
Ensuring vendor address information is cleaned and loaded correctly. Our tool does light cleaning, including whether an attention line is included in the street address, identifying the correct NetSuite country, and eliminating duplicate addresses.
-
Maintaining multiple emails and phone numbers by loading these as separate contact records and assigning them to the appropriate vendor.
-
Identifying employees created as vendors and flagging these records as potential employees.
Our tool creates the vendor CSV upload template so you and your team avoid the need to prepare these files manually.
Closing
OptimalData Consulting has automated the process of exporting, cleaning, formatting, and uploading vendor (and customer) records from QuickBooks to NetSuite.
If you found this article helpful, here are other ways I can help you:
-
Hire OptimalData Consulting to migrate your entity records and historical financial data into NetSuite. Contact me today for a free quote.
-
Purchase my saved search course for accountants or my transactional CSV guide for $50, both available on my website.
-
Sign up for my upcoming QuickBooks Online to NetSuite data migration course.


.png?width=352&name=Transaction%20Count%20Image%20(1).png)