NetSuite, Implementation, Data Migration, Planning, Accounts Receivable
July 9, 2026
9 min Read
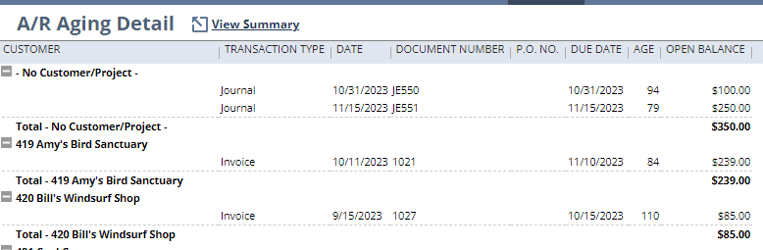
The "No Customer" line appears on a NetSuite AR aging report when a journal entry posts to an Accounts Receivable account without a customer assigned. To fix it, reopen the affected periods, assign a placeholder customer to those journal lines with a CSV update, then apply a zero-dollar customer payment to net the lines against each other.
NetSuite aging reports show your customers' outstanding balances, so a "No Customer" line at the top of the report is confusing the first time you see it. It usually traces back to historical data that was migrated from QuickBooks incorrectly during a NetSuite implementation. Below, we cover why it happens and how to correct it.
TL;DR
- The "No Customer" line comes from journal entries posted to an AR account with no customer assigned, usually a data-migration or allowance-account misconfiguration.
- Fix the root cause by reopening the periods, assigning a placeholder "Import AR Customer" via CSV Update, then applying a zero-dollar payment to net the lines.
- Always filter on the Customer sublist, not the Name column, or a vendor mis-tagged to an AR account will slip through undetected.
- Prevent the problem upstream: limit the "Accounts Receivable" account type to a third-party AR and an intercompany AR account, and map everything else, like Other Receivables, to "Other Current Asset."
- If reopening periods isn't an option, a filtered custom AR aging report hides the line but does not fix the underlying issue and can drift out of tie with the trial balance.
This article only walks through the accounts receivable side of these transactions. The same steps apply to accounts payable transactions as well.
Why does the No Customer line appear on a NetSuite aging report?
The "No Customer" line in the accounts receivable aging report appears when journal entries are created without being linked to a specific customer. This can happen for a few reasons:
- Forgetting to include a fictitious customer when loading the historical trial balances into NetSuite during the implementation.
- Having an "Allowance for Doubtful Accounts" GL account configured as an "Accounts Receivable" account type and not assigning a customer to the journal entry line.
- Accidentally assigning a vendor to an accounts receivable line.
A common root cause we see is clients mapping arbitrary accounts, such as "Other Receivables," to the "Accounts Receivable" account type. Once an account carries the AR account type, NetSuite expects a customer on every line that hits it, so entries that were never meant to be customer receivables show up as No Customer lines. As a best practice, limit the "Accounts Receivable" account type to two accounts: a third-party AR account and an intercompany AR account. Set everything else, including Other Receivables, to the "Other Current Asset" account type.
How do you correct the No Customer line?
The only way to correct this error is to reopen the old accounting periods, add a customer to the journal entry lines, and apply the lines against each other with a zero-dollar customer payment. You can do this with a saved search and the CSV Import tool in NetSuite.
Prerequisites before getting started
Complete or prepare a few items before changing any records in NetSuite:
- Create the fictitious customer record to assign the No Customer lines to. I typically call this "Import AR Customer," but any name that is meaningful to you will work.
- Validate that the No Customer lines net to zero, or that a plan exists to reconcile them. If the entries relate to the historical data import, there might be a hanging variance that should be written off. This can take some work from your team to review the issue.
- Coordinate with your controller and administrator about reopening the accounting periods. There are risks with opening old periods. I highly recommend completing this task in the sandbox first, especially if your entries are very old.
Correct the No Customer line with a saved search and CSV Import
Step 1: Create the saved search
Navigate to a new saved search under Lists -> New Search. Select “Transaction” under the search type. Then, check the “Use Advanced Search” option.
Under the Criteria subtab, you’ll want to add these filters:
-
Account Type set to “Accounts Receivable.”
-
Customer: Internal ID is set to “Is -None-” (note that this option is embedded under the “Customer section” at the bottom of the list.)
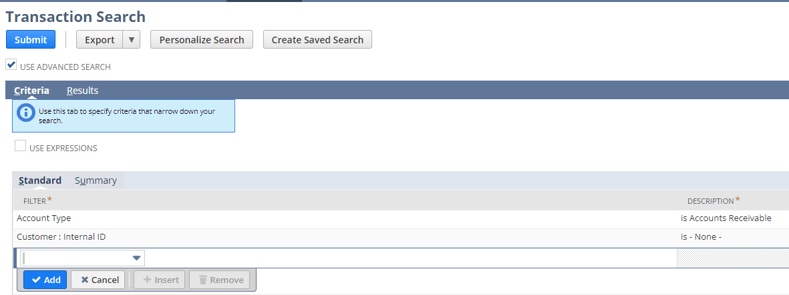
Using the Customer sublist instead of the generic Name column is essential. If a vendor is tagged on an Accounts Receivable account type, using the Name column won’t catch the error in the journal because the search will think the Name is sufficient.
Under the Results subtab, you’ll need to include, at a minimum:
-
Internal ID
-
Type
-
Period
-
Name
-
Line ID
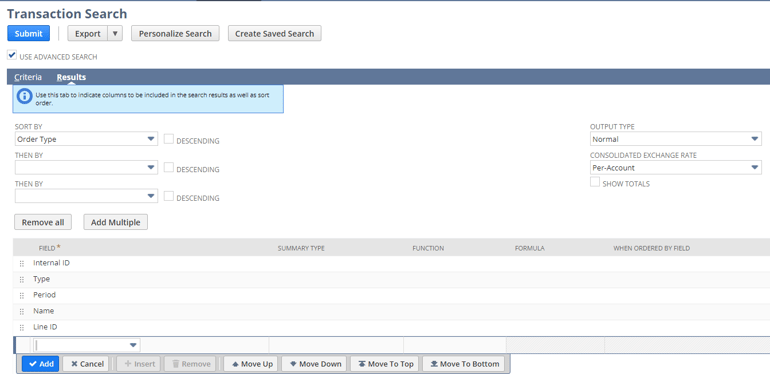
Once this search is created, you can export the results to a CSV file.
Step 2: Add the Name to the CSV file
The “Name” column in your spreadsheet should be blank. Now, you’ll want to add the Name or Internal ID of your fictitious “Import AR Customer.” This customer is a placeholder entity used only to compare these historical journals.
Step 3: Reopen the periods
Navigate to the “Manage Accounting Periods” page under Setup -> Accounting -> Manage Accounting Periods. Click on the earliest period for which you need to edit entries. Reopen the period. NetSuite will prompt you to provide an explanation. You can use something like “Add customer to historical journal entries.”
Step 4: Upload the CSV file
Now, navigate to the import CSV page under Setup -> Import/Export -> Import CSV Records. Select the import type to be Transactions and the Record Type to be Journal Entry. On the import options, select the “Update” radio button.
You’ll want to map the Internal ID, Name, and Line ID fields on the field mapping page. If you are mapping the Name based on the Internal ID, click the pencil to update this option.
I’d recommend loading a test transaction if you have more than five entries to ensure the upload worked correctly.
Step 5: Validate that the upload worked
Once the CSV upload is complete, I would run the A/R Aging Detail report and confirm that the “No Customer” lines have been replaced with the “Import AR Customer” lines. You can also rerun the search from step 1 and confirm no results are returned.
Step 6: Close the periods
Navigate back to the “Manage Accounting Periods” page. You can close the periods using the “Close Multiple Periods” button.
Step 7: Apply the payments and inactivate the "Import AR Customer"
Finally, find the “Import AR Customer” page and click the “Accept Payment” button on the top left. Select all the journals in the “Invoices” and “Credits” subtabs on the payment screen. The payment amount should be zero. Click save.
Then, go back to the “Import AR Customer” and inactivate the customer.
What should you consider when reopening periods?
Reopening periods typically create anxiety for accounting teams. Here are a few considerations to ease their worries:
- Have a user who doesn't regularly post transactions make these changes. This makes it easier to identify changes in the System Notes subtab.
- Keep email documentation that runs through the exact steps and includes the appropriate approvals within the organization.
- Run a trial balance before and after the updates to validate that the account balances didn't change.
- Complete this process during non-working hours.
- Test this process in the sandbox first. This confirms your changes work as expected and lets you validate the trial balance.
Users who complete this process will likely need "Administrator" privileges for Steps 3 and 6.
Which other transactions can post to AR/AP accounts without a Name?
The only other transaction type besides a journal entry that can post to an accounts payable or receivable account without a Name assigned is the Deposit transaction. Deposit transactions cannot be changed with a CSV load. To add the Name, you will need to add it manually.
How do you create a custom report to exclude the No Customer lines?
If reopening the periods isn't an option, a custom AR aging report is another option. The benefit is that you don't need to reopen the periods. The downside is that you aren't fixing the underlying issue.
You also risk a reconciliation issue between the trial balance and the aging report. If a user accidentally posts another entry without a Customer assigned, that entry won't appear on the custom aging report, causing a variance between the two reports. Two examples are the allowance for doubtful accounts for AR transactions or accrual entries for AP transactions.
To create the report, follow these steps:
- Navigate to a new A/R aging detail report under Reports -> Customer/Receivable -> A/R Aging -> Customize Detail.
- Under the filters section on the left, open the "Unpaid Receivables Transactions" section and find the "Entity" option. On the filter dropdown, select "Not Empty" and click Add.
- Save the report.
What if my No Customer balance is not zero?
If the No Customer balance is not zero, investigate it before doing anything else. A few considerations:
- If you recently implemented NetSuite, it might be an error in the data migration. The imported open AR balance most likely didn't match the accounts receivable balance on the trial balance.
- You might have journal entries, such as the allowance for doubtful accounts entry, posted to the accounts receivable aging. This only occurs if your allowance for doubtful accounts is configured as an "Accounts Receivable" account type.
The best practice is to avoid using journal entries to post to accounts receivable and accounts payable.
If you recently implemented NetSuite, consider contacting OptimalData or your implementation partner to review the open AR data migration.
If you need a quick fix, post a journal entry in the current period to allocate the No Customer balance to the correct customer. That will zero out the No Customer balance and transfer it to the correct customer account. This solution isn't ideal, but it might be the easiest path forward.
Frequently Asked Questions
Does fixing the No Customer line change my accounts receivable balance?
No. Assigning a placeholder customer and applying a zero-dollar payment reassigns the lines without changing any GL amounts, so your AR balance and trial balance stay the same. The No Customer line is a presentation issue on the aging report, not a balance error.
Can I just delete the journal entries that are causing the "No Customer" line?
No. Deleting the entries would change your accounts receivable balance and break the tie-out to your trial balance. The correct approach is to assign a customer to the existing lines, then net them with a zero-dollar payment.
Does the same fix work for a No Vendor line on the AP aging report?
Yes. The accounts payable side follows the same process: reopen the periods, assign a placeholder vendor to the journal entry lines with a CSV update, then apply a zero-dollar bill payment to net the lines. The one exception is the Deposit transaction, which cannot be updated via CSV and must be corrected manually.
How do I stop the No Customer line from coming back?
Limit the "Accounts Receivable" account type to third-party AR and intercompany AR accounts, and map other balances, such as Other Receivables, to "Other Current Asset." As a rule, avoid posting journal entries directly to AR and AP accounts, since those entries are most likely to be posted without a customer or vendor assigned. If you need to post journals to the AR subledger, consider creating a monthly saved search that emails the team about lines missing a "Name" assignment, so they can be reviewed before the period closes.
Do I need administrator access to fix the No Customer line?
Likely yes. Reopening and closing accounting periods, Steps 3 and 6 above, generally require Administrator privileges. Coordinate with your controller and system administrator before you reopen any closed period.
Conclusion
Running into this issue usually means something was missed during your data migration. Before you spend time manually fixing reports, validate the root cause: a No Customer line is a symptom, and the underlying historical trial balance import is often the source of the real problem.
If you need help reviewing or correcting your NetSuite data, contact OptimalData Consulting to get it resolved quickly.