Implementation, Post-go-live, Bank
9 min Read
Your first bank reconciliation in NetSuite comes down to three moves: pull the last completed reconciliation from your legacy system, clear the migrated general ledger (GL) transactions on the Match Bank Data page for everything dated on or before that statement date, then reconcile to the same ending statement balance. If the difference comes to zero, you are done.
The reconciliation itself is not the hard part. The hard part is that this exercise is really the first honest test of your data migration. If cash will not tie, the problem is almost always in what was loaded, not in the reconciliation screen.
Key Takeaways
- Complete the final reconciliation in your legacy system before you attempt the first one in NetSuite.
- Any transaction left uncleared in the legacy reconciliation must stay uncleared in NetSuite.
- Use the "To" date filter on Match Bank Data to exclude anything dated after the legacy statement date.
- If you loaded summary-level financials, clear the summary journals plus the reversing entry instead of individual transactions.
- Credit cards count. NetSuite will not let you reconcile child credit card accounts under a parent the way QuickBooks Online does.
What do you need before your first NetSuite bank reconciliation?
You need three things in place before you open the Match Bank Data page:
- Historical financials loaded and tied to the legacy system. Your historical financials should be loaded and validated with a detailed transaction tie-out against the legacy system through the go-live date.
- The last bank reconciliation completed in the legacy system. You need the report itself, not just the ending balance, because you need the list of uncleared transactions as of that date.
- Open bank transactions imported, if you loaded summary-level historical financials or if there are outstanding bank transactions dated before your detailed transactions begin. See my guide on how to import open bank transactions to NetSuite.
Once those three are set, you are ready to start.
How do you complete the first bank reconciliation in NetSuite?
1. Build a bank reconciliation tracker
Before touching a single account, build a tracker so you know what "done" looks like. On a multi-entity migration this is the difference between a controlled process and a guessing game.
Download the chart of accounts from NetSuite, then:
- Filter to Bank and Credit Card account types only. That filtered list is your complete scope.
- Delete every column except Inactive, Internal ID, Number, Account, Type, and Currency.
- Add three tracking columns: Reconciled, Thru, and Notes.
- Add a Legacy Account column and populate it from your segment map file with an XLOOKUP on the internal ID.
Save it in the client folder as [Client Name] - bank rec tracker. The Currency column matters more than it looks, and I explain why in the troubleshooting section below.
2. Run the last completed bank reconciliation from your legacy system
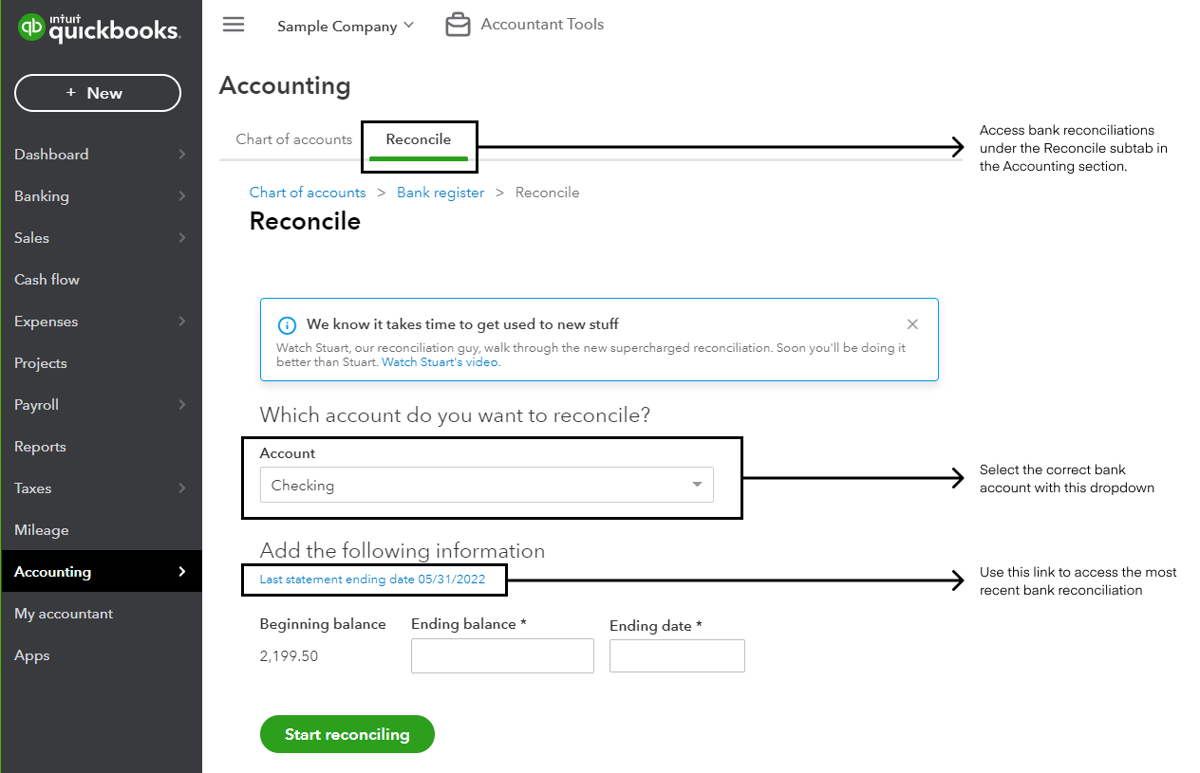
Get the most recent detailed bank reconciliation out of the legacy system. In QuickBooks Online, go to Accounting → Reconcile, select the bank account in the dropdown, and QuickBooks will highlight the last statement reconciliation in blue. Click the link.
Navigate down to the uncleared transaction section. Any transaction that was uncleared in the legacy reconciliation must remain uncleared in NetSuite. That list is the single most important artifact in this whole process.
If you cannot find these reports in the legacy system, request them from the client before go-live. Chasing them afterward, sometimes after legacy system access has already lapsed, is a common and entirely avoidable delay.
3. Clear the migrated GL transactions on the Match Bank Data page
In NetSuite, navigate to Transactions → Bank → Match Bank Data. In the Account field, select the bank account you are reconciling.
On the right side of the page, under Account Transactions:
- Set the "To" date filter to the date of the legacy bank reconciliation. If the legacy reconciliation runs through 9/30/2025, set the filter to 9/30/2025. This keeps post-cutover activity out of the exercise entirely.
- Click the box under All Transaction Types to select every transaction in the filtered list.
- Go back to your legacy reconciliation and uncheck every transaction that was uncleared as of that date. If there are no uncleared transactions, move on.
- If you cannot find an uncleared transaction in the list, check whether NetSuite already auto-matched it. This happens when the bank feed has been turned on before the first reconciliation.
- Scroll down to the matching section and click Clear.
- Open the Review tab, select the transactions to be cleared, and click Submit Selected.
One caution on step 6: if the client has already enabled bank feeds, do not clear anything dated after the legacy reconciliation date. Those transactions belong to the client's first live reconciliation, not to yours.


4. Reconcile the account statement
Either click the Reconcile Account Statement button or navigate to Transactions → Bank → Reconcile Account Statement.
Select the NetSuite account, then enter the Statement End Date and the Ending Statement Balance from the legacy bank reconciliation.
A practical shortcut here: click the select-all box to uncheck every transaction, then set the "To" date filter to the reconciliation date. That is faster than working down a long list by hand.
If the Difference is zero, click Reconcile to finish that account. If it is not zero, skip to the troubleshooting section below.
5. Repeat for every bank and credit card account
Work down the tracker and complete these steps for each account carrying a non-zero balance at go-live. Mark each one Reconciled with the Thru date as you go.
Credit cards are the ones that get forgotten. They are in scope; they behave differently from bank accounts in one important way, and I cover that below.
How is this process different if you loaded summary-level historical data?
If you loaded historical financials as summary-level journal entries rather than individual transactions, steps 2 and 4 are the same but step 3 changes.
Summary journals post one lump amount to the bank account, so there are no individual transactions available to clear. That is why the outstanding bank transactions have to be imported separately, through a suspense account, with the GL impact reversed by a journal entry. See my article on how to import open bank transactions to NetSuite for that process.
On the Match Bank Data page, you then clear two things instead of one:
- The summary-level journals that hit the bank account. The total of these should equal the book balance.
- The journal entry that reverses the GL impact of the imported open bank transactions. This brings the cleared reconciled amount to the bank balance.
The individual open bank transactions stay uncleared, which is exactly what you want. They are the outstanding items the client will clear against their live bank feed.
What if you imported bank transactions that relate to legacy data?
When the bank data was loaded, you may have imported transactions that were already reconciled in the legacy system. There is no reason to match those again in NetSuite.
To clear them out, check every bank transaction dated before the last completed legacy reconciliation, then click Exclude. This removes them from the Match Bank Data page without touching the GL.
For example, in the screenshot below, I checked all the April 2022 transactions because the April 2022 reconciliation had already been completed in QuickBooks.

Why is my first NetSuite bank reconciliation not zero?
A non-zero difference points to the migration, not to the reconciliation screen. Start by confirming that every transaction left uncleared in the legacy reconciliation is still unchecked on the Match Bank Data page, and that nothing dated after the statement date slipped past the date filter.
If those check out, one of the following four issues is usually the cause.
Realized gain and loss entries on foreign currency accounts
This is the one that costs people the most time, and it only appears when a bank account's currency differs from the subsidiary's reporting currency.
In the legacy system, realized gain and loss journals post as zero-dollar transactions in the bank's currency while still carrying a GL impact in the reporting currency. Those entries have to be loaded for the trial balance to tie out, but they create a variance in the bank reconciliation because NetSuite sees a transaction the bank statement never will.
Here is the approach that resolves it cleanly:
- Leave the realized gain and loss entries unchecked in the initial bank reconciliation.
- Post a reversing journal entry dated the first day of the next period, the period in which the client will run their next reconciliation. If the first reconciliation clears through 9/30/2025, date the reversing entry 10/1/2025.
- Build that entry to directly offset the uncleared realized gains and losses, with a net-zero impact.
- Complete a zero-dollar bank reconciliation dated 10/1/2025 to clear both sides out of the Match Bank Data page.
When the client runs the Period Close process in NetSuite, the system-generated realized gain and loss offsets the impact of that journal entry, and the account stays clean going forward.
Credit card accounts that were reconciled under a parent in QuickBooks
QuickBooks Online lets you reconcile all child credit card accounts under a single parent account. NetSuite does not. Each card has to be reconciled individually against its own statement.
Catch this during scoping rather than at go-live. A client with one parent card account and eight cards underneath it does not have one reconciliation ahead of them; they have eight, and each one needs its own statement.
Transactions auto-matched by an active bank feed
If the bank feed was connected before the first reconciliation, NetSuite may have already auto-matched transactions that should have stayed uncleared. When an uncleared item from your legacy reconciliation is missing from the Match Bank Data list, this is almost always why. Check the matched items before assuming the transaction was never loaded.
Too many transactions to select
The Account Transactions list displays 100 transactions at a time, which can be painful for high-volume accounts. Three things help:
- Use the date filters and select in batches rather than paging through everything.
- Increase Maximum Entries in the dropdown under Set Preferences.
- Clear earlier periods first, then work forward.
Frequently asked questions
Do I need the bank feed connected before the first reconciliation?
No, and in most cases it is better if it is not. The first reconciliation clears migrated GL transactions against a statement balance you already have from the legacy system. Connecting the feed afterward means live bank data starts matching from a clean, reconciled position rather than auto-matching transactions you still need.
How far back should the first reconciliation in NetSuite go?
All the way back through the earliest period for which you migrated transactions. The first reconciliation is a single event that clears all migrated transactions that have already cleared the bank in the legacy system, which is why you set the "To" date filter to the legacy reconciliation date and select everything below it, rather than working period by period. The only items you leave unchecked are those that were still uncleared in the legacy reconciliation.
Imported bank feed data covering those same historical periods is a separate matter. Exclude it rather than matching it, since those transactions were already reconciled in the legacy system.
Do credit card accounts need an opening reconciliation too?
Yes. Any bank or credit card account with a non-zero balance at go-live needs an opening reconciliation, which is why the tracker is built from the chart of accounts rather than from the accounts someone remembers. The only difference is that NetSuite requires each credit card account to be reconciled individually, even though the legacy system allowed a consolidated parent-level reconciliation.
What to check before you call the reconciliation done
The first reconciliation is more a test of the migration than of the reconciliation process. When the difference reaches zero, you have confirmed three things at once: the historical load ties to the legacy system, the open bank transactions were imported correctly, and the cutover date is consistent across the board. That is why I treat it as the final validation step on every migration rather than as a post-go-live task for the client to figure out alone.
Two artifacts make this a short exercise rather than a long investigation: the final reconciliation report from the legacy system and a clean list of uncleared transactions as of that date. Collect both before go-live, while legacy system access is still live.
If your historical financials are loaded and cash still will not tie, get in touch, and we can work through it. Or browse the implementation resource page for more on preparing a NetSuite implementation.

.png?width=352&name=NetSuite%20CSV%20Import%20Tool%20(1).png)