Implementation, QuickBooks, Open Transactions
January 14, 2026
15 min Read
Introduction
Importing open accounts receivable (AR) transactions during a NetSuite implementation is required to begin receiving payments for outstanding invoices. This post will discuss preparing, loading, and validating your open balances from your legacy detailed AR aging report.
This post is relevant for companies migrating data using a net change or summary trial balance approach for historical financial statements. Loading open AP transactions won't be necessary if you upload detailed transactions. Check out this article to learn how OptimalData Consulting loads detailed transactions.
Why do we use a suspense account?
You imported the monthly financial statements with a journal entry. These journal entries recorded the original general ledger (GL) impact for all transactions posted in the legacy system, including the open AR transactions. After completing this step, your legacy system and NetSuite financial statements should match at the GL account level.
However, this step excludes the individual invoices that will receive payment. We need to create these invoices without impacting the GL.
The solution is to use a suspense account. This will prevent us from double-counting our revenue balances. Don't worry. The suspense account will have a zero-dollar balance at the end of this process. Keep reading to find out how.
Before Starting
Before loading open accounts receivable into NetSuite, complete the following cleanup steps in your legacy system. Skipping these items almost always leads to reconciliation issues after go-live.
Required pre-work
Load historical financial statements
Before touching open AR, ensure your historical monthly financial statements are loaded or at least finalized. This establishes a clean baseline and prevents teams from trying to “fix” AR discrepancies by adjusting post-go-live activity.
If you are unsure where to start, see my article on loading historical monthly financials.
Apply all AR offsets
Apply customer payments, customer credits, and journal entries against open invoices wherever possible. Journal entries are frequently used for contra-AR balances and should not remain open unless intentionally unresolved.
Leaving unapplied offsets almost always results in overstated AR or customer-level discrepancies in NetSuite.
Clean up journal entries
Add a customer name to any journal entries impacting AR that are missing one.
-
If the journal entries net to zero after review, exclude them from the import entirely.
-
If they do not net to zero, they must be tied to a specific customer.
Failing to do this will result in “No Customer” balances on the AR aging, which are difficult for users to resolve post-go-live.
NetSuite setup prerequisites
Create an OPENAR clearing account
Create a suspense account to capture the general ledger impact of the open AR load. This account is typically named OPENAR and configured as an expense-type account. This account will be reversed after go-live once AR activity resumes in NetSuite.
Create a non-inventory item for AR loading
In NetSuite, invoices and customer credits require an item. Create a For Sale, Non-Inventory Item configured to post to the OPENAR clearing account. This ensures the AR subledger loads cleanly without distorting revenue or operational accounts.
Disable auto-numbering for AR transactions
By default, NetSuite auto-assigns document numbers to invoices, credit memos, and customer payments unless overrides are enabled.
For open AR migrations, you typically want to preserve the original legacy transaction numbers to support auditability and customer support workflows. Before loading any AR data, update the auto-numbering settings to allow manual numbering.
Navigate to:
Setup → Company → Auto-Generated Numbers
Under Document Numbers, enable overrides for invoices, credit memos, and customer payments as needed.
This change should be completed before starting any imports. Once the migration is complete, you can revert the settings to your preferred production configuration.
Final validation before loading
Reconcile AR to the trial balance
Confirm that the AR aging ties exactly to the trial balance. In single-ledger systems like QuickBooks, this is usually straightforward. In systems such as Great Plains, Oracle Fusion, or Intacct, discrepancies are more common and should be resolved or clearly documented before migration.
Any differences that exist before go-live will not fix themselves in NetSuite.
How to import open AR transactions
1. Prepare and format the data from the legacy system.
First, navigate to the AR detailed aging report. In QuickBooks Online, the out-of-the-box list should include all the needed data. If you have customers with non-USD currencies, add the currency and open balance foreign currency columns to the report.
Export the report to Excel. Remove the headers, footers, subtotal, and total lines. Feel free to remove any blank columns. Finally, remove the amount column because we are loading the outstanding balances. Check out the video below for a tutorial on how to do this in QuickBooks Online.
Last, validate that the total open balance in the Excel spreadsheet matches the AR balance in NetSuite at the go-live date.
2. Map the legacy system values to NetSuite
Next, we must map the legacy system values to the new NetSuite values. Users will need to:
-
Map transaction types: Transactions impacting AR are a 1:1 match with NetSuite and QuickBooks. Load invoices as invoices, payments as payments, and credits as customer credits. You cannot import customer deposit transactions into NetSuite. Either enter these manually or load the deposits as journal entries. Remember, each NetSuite transaction type will need a separate CSV upload template.
-
Map the customers: Customers with an existing balance should exist in both QuickBooks and NetSuite. See my article on the segment map file for more details.
-
Map the account: Open AR transactions should involve only two general ledger accounts: the OPENAR suspense account and the AR account. You must use the OPEANAR item record instead of the GL account for the invoice and customer credit uploads.
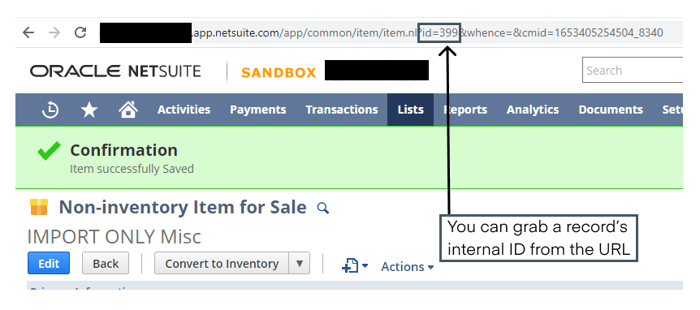
I recommend mapping NetSuite values by internal ID rather than name. The internal ID is easier to track. Also, there is a lower likelihood of a typo. Check out bullet one in this article for instructions on adding internal IDs to all lists in NetSuite. You can also find this on the URL of any record in NetSuite:
3. Prepare and load CSV upload files by transaction type
Once NetSuite segment values have been added to your source data, you can begin preparing the CSV files for upload. Each transaction type must be loaded using its own CSV file.
To access the import tool, navigate to:
Setup → Import/Export → Import CSV Records
CSV preparation and upload tips
Use the correct upload templates
Your NetSuite implementation partner should provide the appropriate CSV templates for each transaction type. If needed, you can also reference my detailed CSV import guide.
Validate with a single transaction first
Before loading a full batch, upload a single transaction to confirm the mapping, approvals, and posting behavior. Even if the import succeeds, verify that the transaction is not stuck in an approval workflow.
Confirm field mapping when using internal IDs
If your file references records using internal IDs, make sure the Field Mapping step of the CSV import is configured accordingly. NetSuite will not infer this automatically.
Standardize the posting period
I recommend posting all open AR transactions into a single posting period, ideally the go-live period. This isolates the general ledger impact and simplifies the reversing journal entry created later in the process.
You can enforce this by either:
-
Including the posting period directly in the CSV file, or
-
Hard-coding the posting period during Step 3 of the NetSuite CSV import process
Required accounting preference
For this approach to work, update the Date/Period Mismatch setting during implementation:
-
Navigate to Setup → Accounting → Accounting Preferences
-
Set Date/Period Mismatch to Warn
Once all historical data has been loaded and validated, you can revert this setting to your preferred production behavior.
4. Validate that the customer balances are correct
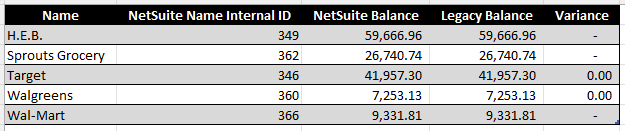
After successfully uploading all transactions, run the AR summary aging report in NetSuite and in the legacy system. Compare the balances using a SUMIF formula. Expect to see a variance in NetSuite for the fictitious AR customer. We will correct that in the next step.
5. Reverse the suspense account balance
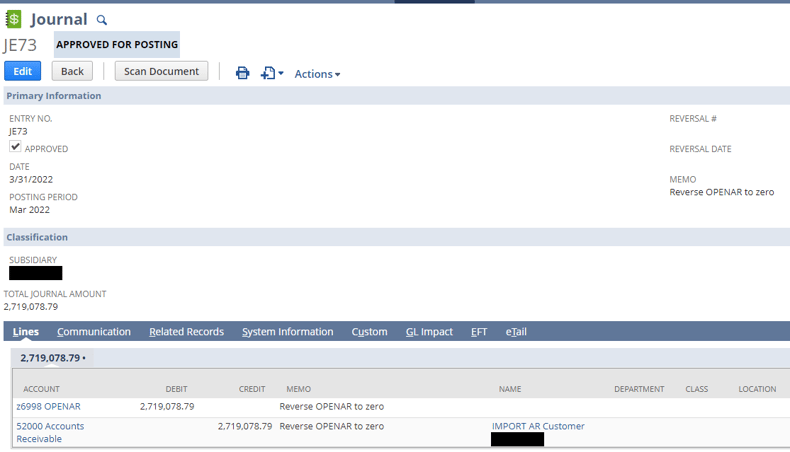
The final step is to reverse the AR balance and OPENAR suspense balance with a journal entry. Again, include the fictitious AR customer name on the AR side. See an example journal entry below. After posting this entry, the AR balance should be correct, and the OPENAR balance should be zero.
If your NetSuite account enforces required segments such as Location, Department, or Class, the reversing journal entry must reflect those same dimensions. Posting a single summarized reversal may zero out the OPENAR clearing account at the total GL level, but it will leave residual balances sitting at the segment level. These stranded amounts typically surface when running segmented reports, such as a P&L by Location.
To prevent this, create a saved search that aggregates open AR balances by GL account and every required segment. Use that output to post the reversing journal entry with matching segmentation. This approach fully clears the OPENAR account across all reporting dimensions, not just in total. As an added benefit, it provides a useful validation that all open AR transactions have been posted to the correct accounting period.
6. Deactivate the appropriate records
After the process is complete, deactivate the fictitious customer, the OPENAR item, and the OPENAR clearing account.
Before deactivating the fictitious customer, navigate to Accept Customer Payment, select the fictitious customer, and net the related journal entries. This step should result in a zero-dollar transaction with no impact on the general ledger.
Deactivating these records prevents users from editing or reusing migration-only objects. Any post-go-live changes involving these records can reintroduce balances into the OPENAR clearing account, creating confusion and unnecessary reconciliation work tied back to the original migration.
Cleaning up the AR aging after a migration
Even after a successful AR migration into NetSuite, it is common to see residual balances that do not fully tie out. This is especially true when migrating from systems with a true subledger, such as Sage Intacct or Great Plains. These differences often appear as AR balances without an associated customer. In addition, there may be legacy offsets that net to zero but were never formally applied in the source system and now need to be resolved in NetSuite.
Below is a simple four-step approach to cleaning up these balances.
1. Identify “No Customer” journal entries
Start by reviewing journal entry lines that have no customer assigned. AR balances cannot be cleared unless a customer is present for the transaction.
-
Update each journal entry to include the appropriate customer, or
-
Reassign them to a placeholder account, such as an Import Only Customer
If you are working with a large volume of entries, use a CSV update import to apply these changes in bulk. This is significantly faster and reduces the risk of manual errors.
2. Apply legacy journals against each other
For each customer, create a customer payment with a zero-dollar amount and apply all related transactions against it.
To be applied together, the transactions must:
-
Use the same AR account
-
Be in the same currency
-
Belong to the same subsidiary
If any of these differ, NetSuite will not allow the application.
3. Clear remaining differences
After applying offsets, small residual balances may remain. Create a journal entry to clear these differences.
Ideally, these amounts are immaterial and can be written off to the income statement. Larger variances should be investigated and resolved before proceeding.
4. Reapply cleanup entries
Finally, repeat Step 2 to apply the cleanup journal entries so they are fully cleared from the AR aging.
Final reminders for loading your open AR transactions
Before considering your open AR migration complete, review the following reminders. These checks help prevent lingering balances in the OPENAR clearing account and reduce confusion for accounting teams post-go-live.
Validate the OPENAR balance immediately
The OPENAR clearing account should net to zero after the reversing journal entry is posted.
If it does not, something is off. Common causes include:
Foreign currency transactions
Review any open invoices or credits denominated in foreign currencies. Differences are often caused by exchange rate mismatches. Confirm both the open amount and the rate used during import.
Approval status
Ensure all imported invoices and credits are in an Approved state. Approval workflows can prevent GL posting and cause AR balances to appear incorrect.
Tax handling
Confirm NetSuite did not automatically calculate or add tax to imported transactions. Any unexpected tax posting will cause AR balances to drift from the legacy system.
Control the posting period intentionally
Set the posting period for all open AR transactions to a single accounting period, ideally the go-live period. This ensures the general ledger impact of the OPENAR clearing account is isolated to a single period, simplifying both validation and the reversing journal entry.
You can enforce this by:
-
Hard-coding the posting period in the CSV file, or
-
Setting it explicitly during the CSV import process
Mixing posting periods almost always complicates reconciliation later.
Lock down the OPENAR account post go-live
After go-live, the OPENAR clearing account should be treated as read-only.
Do not allow users to edit the GL impact of transactions that are posted to OPENAR. Any manual changes will break the reconciliation between the OPENAR account and the imported AR balances. Deactivating the GL account and item will prevent future changes.
Once the reversing journal entry has been posted and validated, the safest approach is to deactivate the OPENAR account to prevent accidental use.
Changing open AR after go-live
If an invoice needs to be changed after go-live, do not use the OPENAR clearing account as the offset.
Instead, reverse the invoice using the original revenue or balance sheet account it was coded to in the legacy system. The purpose of the write-off is to reverse the original accounting impact, not to touch the migration clearing account. Using OPENAR in this scenario will leave residual balances and distort period or segment reporting.
Adding other fields to the open AR
In some migrations, you may need to carry over more than just the open balance and customer reference. Common examples include due dates, payment terms, billing addresses, shipping addresses, sales reps, or custom reference fields used by downstream teams.
If this data is available and reliable in the legacy system, these fields can be populated directly through the NetSuite CSV import templates.
Closing
This post discussed the steps to load your open accounts receivable transactions during a NetSuite implementation.
You might be interested in my other NetSuite data migration resources:
-
My free QuickBooks Online to NetSuite YouTube Playlist, featuring step-by-step instructional videos from start to finish for a QuickBooks to NetSuite transition.
-
My transactional CSV guide with templates for eight common transactions imported into NetSuite.
-
My other blog posts include instructions for importing your open accounts payable and bank transactions.
-
My implementation resource page includes other tips & tricks for executing a successful NetSuite implementation.