Financial Reporting, NetSuite, Accounts Receivable
April 11, 2024
6 min Read
Introduction
Managing accounts receivable is critical for maintaining an organization's working capital. In NetSuite, there are several ways to review a customer's transaction activity. This article will go through the steps to create a saved search to manage this essential task.
What is a Saved Search?
A saved search is a reusable custom report for users to add filters, fields, and permissions. Saved searches are ideal for data exports used in Excel, like a pivot table or budget-vs-actual analysis. Saved searches work well with live data, not point-in-time data, like an accounts receivable aging report.
To navigate to a saved search, go to Reports → New Search. You can select the record type to build a search on that page. I use saved searches for Account, Department, Class, Subsidiary, and Transaction record types.
To find a previously-used saved search, navigate to Reports → Saved Searches → All Searches. Remember, the person who built the report must make it a public search for other users to access it.
How to build an accounts receivable saved search
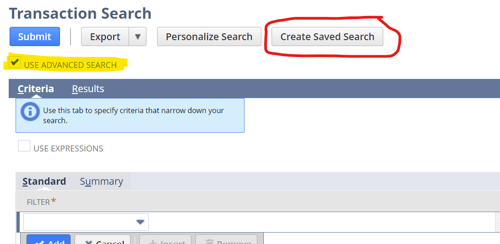
1. Create the saved search
Start by navigating to a new saved search. Go to Reports → New Search. On the search type, select “Transaction.” If this is the first time building a transaction saved search, I’d recommend checking the “Advanced Search” checkbox. I find this view to be easier to navigate.
Next, click on the “Create Saved Search” button. Add an appropriate report name in the search title field.
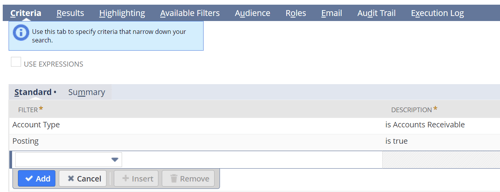
2. Add the saved search criteria
Think of the Criteria subtab as the space where you add the filters to your search results. In our situation, we want to review accounts receivable transactions. The criteria we will use are:
-
Account Type: Accounts Receivable
-
Posting: True
We set the Account Type field to Accounts Receivable because we want accounts receivable accounts in the results. We set the Posting field to be true because we only want to see approved transactions in our search results.
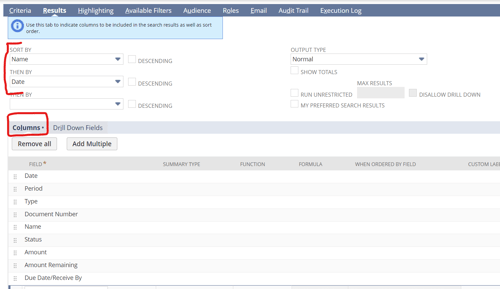
3. Set the saved search result fields
Next, navigate to the Results subtab and add the columns to the report. Here are a few fields I’d recommend including in your search:
-
Date
-
Period
-
Type
-
Document Number
-
Name (more on this field below)
-
Status
-
Amount
-
Amount Remaining
-
Due Date
If you use journal entries in your accounts receivable results, you’ll want to replace the “Name” column with the formula in this article.
I’d also recommend sorting the results by Name and Date. See the screenshot below for an example.
I would encourage you to experiment and edit the column results for what is relevant to your business. For example, consider adding the sales order number to the search results if you are using sales orders. You can always click the blue “Save & Run” to see the results, edit the search, and modify as needed.
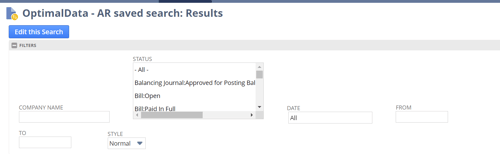
4. Include filters in the saved search results
Until now, our search is returning all the accounts receivable transaction lines. We want to add functionality to allow end users to search for specific customer transactions to investigate issues. Let's add a few filters:
-
Name filter - This filter allows users to search for a customer name. We want to avoid a dropdown list of customers. See the YouTube video below to complete this.
-
Status filter - This filter allows users to see only open invoices.
-
Date filter - This filter allows users to select a date range to see transactions.
Once these are configured, users can modify the search results in real-time instead of directly modifying the search. You can see where the filters are in the search below.
5. Add permissions to the saved search
Finally, we need to set permissions on the saved search. If you want other users to be able to use the search, you’ll need to check the “Public” checkbox. In addition, under the “Audience” subtab, you’ll want to select which roles and/or employees can use the saved search. Finally, if you want other users to be able to directly modify your search, check the “Allow Audience to Edit” box.
NetSuite Saved Search Field Filter Extension for Chrome Users
One frustration with the default saved search setup is how hard it is to find fields. Thankfully, for Google Chrome users, there is a free extension available. You can install the extension with this link. You can find out more in the YouTube video below.
Closing
Saved searches are a powerful way to access, analyze and use your data to complete essential business tasks like managing accounts receivable. This article went through the step-by-step process of creating a saved search. If this was helpful, consider looking at my other reporting resources or enrolling in my saved search course for accountants.
Go from drowning to mastering your Netsuite data?
Unlock Netsuite's saved search functionality by learning three saved searches I build for all of my 75+ clients.


.png?width=352&name=NetSuite%20CSV%20Import%20Tool%20(1).png)