Financial Reporting, NetSuite, Segments
January 10, 2024
2 min Read
Update segments via CSV import with a NetSuite saved search
Looking for tips, tricks, and how-to articles on reporting in NetSuite? Check out our NetSuite Reporting Resource page.
Changing transaction coding via a CSV import template is critical when the volume of transactions is too high to do this task manually. Two use cases for this skill are updating the department coding for all transactions with a specific vendor for comparative financials or adding a class code for transactions migrated from QuickBooks during a NetSuite implementation. This blog post will walk through the steps to complete this process using a NetSuite saved search.
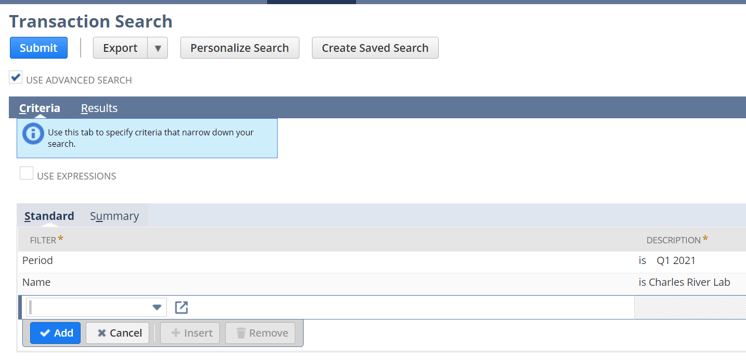
We need to build a transaction saved search with the transactions we want to modify. To do this, navigate to Reports->New Search and select 'Transactions.' Select the subset of transactions you need to clarify on the criteria subtab. If you aren't sure or want to look at everything, leave this section blank. In my example, let's review the Q1 2021 transactions with the vendor 'Charles River Lab.'
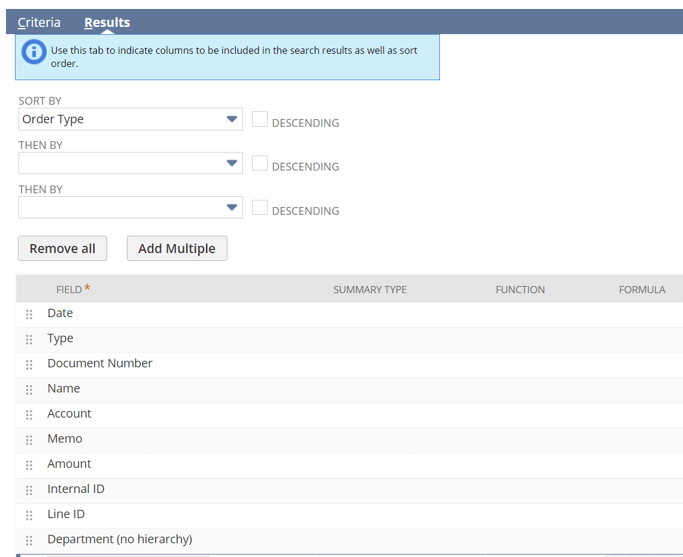
 On the results subtab, you'll want to include, at a minimum, the Internal ID, Line ID, and the Transaction Type. Include the line ID because this dictates the line number on the modified transaction. Include the type because this will determine the CSV import template. Finally, include any other fields that might be relevant to your update. I have the Vendor Name, Date, Account, Memo, and Department fields in my example.
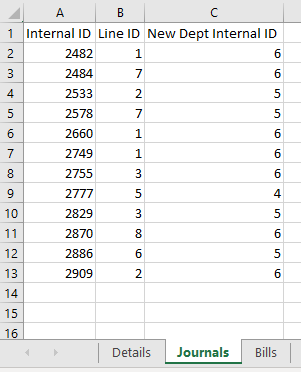
 Export your saved search to Excel. In Excel, we can manipulate the data efficiently. For example, I've added a new department I want to reclass my transactions in my file. Notice that I am using the department's Internal ID for the import. The Internal ID is the best way to ensure the import file works correctly.
The next step is to split the new data by transaction type. This process is essential because each transaction type has a unique CSV import page. I'd recommend creating a separate tab for each transaction type and a single tab with all the transaction types. See the screenshot below. You only need to keep the Internal ID, Line ID, and the new segment value in the upload tabs. Save each tab as a separate CSV file. I'd also recommend splitting the files again with only one or two records as a test version first. The test upload validates that the load worked and had no unintended side effects, like triggering a journal entry approval workflow.

Finally, navigate to Setup->Import/Export->Import CSV Records to load the CSV files. Two other reminders:
-
On the 'Import Options' page, select 'Update' instead of 'Add.'
-
If you use Internal IDs to map to segment values, you'll need to select the pencil icon and map to 'Internal ID' instead of 'Name.'
You can rerun your search results and confirm that the transactions reflect the new data.
If your team is cleaning up imported data from a data migration with a CSV template, contact OptimalData Consulting. We can help ensure your migrated data came over as expected and ties out correctly.


.png?width=352&name=Transaction%20Count%20Image%20(1).png)


